Events and attendance
Members Group adminsEvents are the center of the app. Group admins create them, members respond to them, and business-tier teams can confirm actual attendance once an occurrence has started and while it is still in progress.
Create an event
Admins open the event form from the group screen. A team can also hand this to its ordinary members — see Who can create one below. The form supports:
- event icon and color,
- title,
- public or private (Business),
- show participants, when the team has handed that decision to its events (Business),
- date and time,
- doors open (Business),
- location,
- participant limits,
- guests,
- reminders,
- recurrence,
- decision deadlines.
Guests are a Pro feature, and they start off on every new event.
- On a Free team the Guests allowed switch is shown with a padlock and cannot be turned on.
- On Pro and Business, turning it on sets a cap of 2 guests per member, which you can change per event (0-9).
- A team can switch guests off for all its events under Settings → Features. The switch then disappears from the event form. Guests members had already registered still count; no new guests can be added, and saving the event clears them.
In practice the normal create flow is:
- Open the relevant group.
- Start the create-event flow.
- Fill in the schedule, participation, reminder, and location fields you need.
- Save the event.
If you started from a calendar context, the chosen day can already be carried into the form so you do not need to pick the date again.
Later edits reopen the same event form, so admins usually learn one flow and reuse it for both creation and updates.
Doors open
BusinessBusiness teams can state when the venue actually lets people in, on the row below the start and end times. Pick any time in the six hours before the start; the row shows a clear button once a time is set, and leaving it unset means the event says nothing about its doors.
The value is kept as a distance from the start rather than a fixed clock time, so a recurring session’s doors move with each occurrence and stay put when the clocks change.
Two things follow from setting it:
- The doors time appears after the time range wherever an event is summarised — the Agenda’s Next up panel, the list under the calendar, and the sessions list — and on its own row on the event’s page. An event with no doors time shows nothing extra anywhere.
- Check-in opens at the doors time instead of the usual two hours before the start. See QR check-in at the door.
A team that drops below Business keeps the doors times it already set, and can still clear them — it just cannot set a new one until it upgrades again.
End time auto-advance
When you move the start time to a value at or after the current end time, the end time automatically shifts forward to start + 1 hour. You do not need to correct the end time manually after pushing the start time forward.
Confirmation when editing time or recurrence
When you save an edit that changes the start time, end time, or recurrence rule, the app checks whether any members have already RSVP’d to affected occurrences. If members have responded, a confirmation dialog appears before saving:
- For a single event: “This event has N members who have responded. Changing the time will clear their responses. Continue?”
- For a recurring event: “This recurring event has N occurrences with N members who have responded. Changing the time will clear their responses across those occurrences. Continue?”
If no one has responded yet, the save proceeds immediately without a dialog.
Clashes with other events
While you pick a date and time, the app checks whether it lands on top of another event on the same team’s calendar — every event type counts, including Info events. If it does, a warning appears under the time fields: “Clashes with Practice (17:30 – 19:00)”. For a recurring event, the app checks every date in the series and summarises how many of them clash, for example “3 of your dates clash with other events, including Practice (17:30 – 19:00)”.
An Info event is on the calendar precisely so that nobody plans on top of it, which is why it counts here. The date options in the activity planning wizard get the same warning. The check has limits: on a recurring event only the first 20 dates are checked, at most five clashing events are named before “and N more”, and an occurrence longer than seven days is not checked at all.
This is only a warning — nothing stops you from saving over another event, since you may mean to. Saving with an unresolved clash asks you to confirm once more: “Save it anyway?” Editing an event that already clashed, without moving it, does not ask again.
Who can create one
Members (when member-created events are on)Creating an event is an admin job by default. A team can hand it to everybody under Settings → Member features → Allow member-created events, and decide separately how much of the form they get:
- With Allow advanced options off — the default — members get the plain form: title, description, place, time, and the participant minimum and maximum. The sections that configure machinery acting on the rest of the team are not offered: repeats, waiting list, reminders, decision deadline, doors open, Discover visibility and the draft lifecycle.
- With it on, they get the same form an admin does.
A member who creates an event can edit, cancel and delete it afterwards, from the event’s own 3-dot menu. That is where it stops: confirming attendance, opening check-in, running the live desk, inviting or removing people and managing the roster all stay with the admins, so an event a member set up still needs an admin on the night. Leaving the team gives up those rights with everything else.
The + on a team’s Agenda tab, and the team list you get when creating from the
home screen, both show only the teams you may actually create in.
Info events
The type selector at the top of the event form offers Session, Activity and Info in a team, and Activity and Info in a group. You choose the type when you create the event, and it cannot be changed afterwards — to get another type, copy the event and pick the new type in the copy.
An Info event is on the calendar for information only — a school holiday, the hall being closed, a tournament in town — so nobody plans something else on top of it. It takes no responses:
- there is no join or decline, no participant list, and no capacity gauge,
- the form hides participant limits, guests, the waiting list, the decision deadline and doors open,
- there is no check-in and no attendance to confirm.
Its card carries an Info badge. Members still hear about it: publishing it sends the usual new-event notification, and you can add a Friendly reminder. Requests for an attendance response are not available. Info events are not shown in Discover and do not count toward your plan’s session limit.
Location and maps
Admins can either type a location manually or tap the map button in the event form to open the location picker.
Tapping into the location field lists the places the team has used before — its home location first, then the venues used in the last three months by events, occurrence changes, activity plans and their date options — and the list narrows as you type. Pick one and the event gets the same map pin the earlier one had. The same places appear under Used before at the top of the location picker.
The location picker lets you:
- search for a place or address,
- tap on the map to drop the pin,
- use the device’s current location,
- and confirm the selected address before returning to the event form.
If you edit the location text manually afterwards, the event can still keep a text-only location even without map coordinates.
When an event has coordinates, its location line grows a chevron: tap it and a mini-map unfolds beneath, which in turn opens full-screen. The same line behaves this way wherever the event is shown — the detail and view screens, the session cards on the home screen, the team agenda and the calendar day list, and the sheet for editing a single occurrence. A location typed by hand without a map pin stays a plain line, since there is nothing to unfold.
Public sessions and Discover
BusinessSessions and activities are public by default, which means they can turn up in the Discover tab on the home screen for people who are not members yet.
Business teams get a compact Public switch on the right of the icon-picker row in the event form. Turning it off keeps that single session out of Discover without making the whole team private. On Free and Pro the switch shows a lock icon, and the upgrade prompt names the feature Private sessions & activities.
The switch only appears when the team could reach Discover at all — public, pinned to a point on the map, and auto-accepting join requests. If the team can never be discovered, there is nothing for an individual session to opt out of.
Discover status on the event form
Business teams also see a Discover status line under the location field, updating live as you edit:
- Discoverable — every condition below is met.
- Not discoverable — the team is private or has no location — fix this in the team’s settings; see Teams and groups.
- Not discoverable — the team must auto-accept join requests — someone who finds the session has to be able to join in time to attend, so manual approval blocks the listing.
- Not discoverable — private — the event’s own Public switch is off.
- Not discoverable — no location set — the event has no location of its own. It does not inherit the team’s.
- Not discoverable — pick the location on the map — an address was typed by hand, so it has no coordinates to search by.
Copying an event carries its public/private state over, the same way it carries guests and notifications. Copying a private event when the team is no longer on Business is a fresh transition to private, so the app answers with the upgrade prompt. An event that went private while the team was on Business stays private after a downgrade, and can always be switched back to public.
Events imported from an external calendar can appear in Discover too, but they have no Public switch of their own — the subscription sets it for the whole feed at once. See Show imported events in Discover.
Sessions created by an activity planning work the same way: they follow the choice made on the planning, so they have no Public switch when they are created. See Public plannings and Discover.
Configure notifications and reminders
When creating or editing an event, admins can add reminders to notify members. Each reminder displays:
- Notification type — Either “Request attendance response” (for participation requests) or “Friendly reminder” (for event reminders)
- Who receives it — For request attendance notifications: either “All members” or “Non-responders only”. For friendly reminders: “IN + No response”.
Notification type constraints
- Friendly reminder: Only one per event is allowed. When a decision deadline is active, the friendly reminder must be scheduled more than 15 minutes before the deadline.
- Request attendance response: Can be scheduled multiple times for different intervals before the event.
If you try to set a friendly reminder that conflicts with these rules, the app shows a message explaining the constraint and suggests a valid time window instead.
The Events tab inside a team
The Events tab in a team or group is split into three sub-tabs, shown as a compact sub-tab bar with an icon next to each label:
- Agenda is the overview of what needs attention right now: group announcements, awaiting-attendance cards, active (in-progress) events, activity-planning cards, cancelled occurrences, and the Next up block with upcoming events.
- Calendar shows the same schedule in a month view so you can inspect it by date.
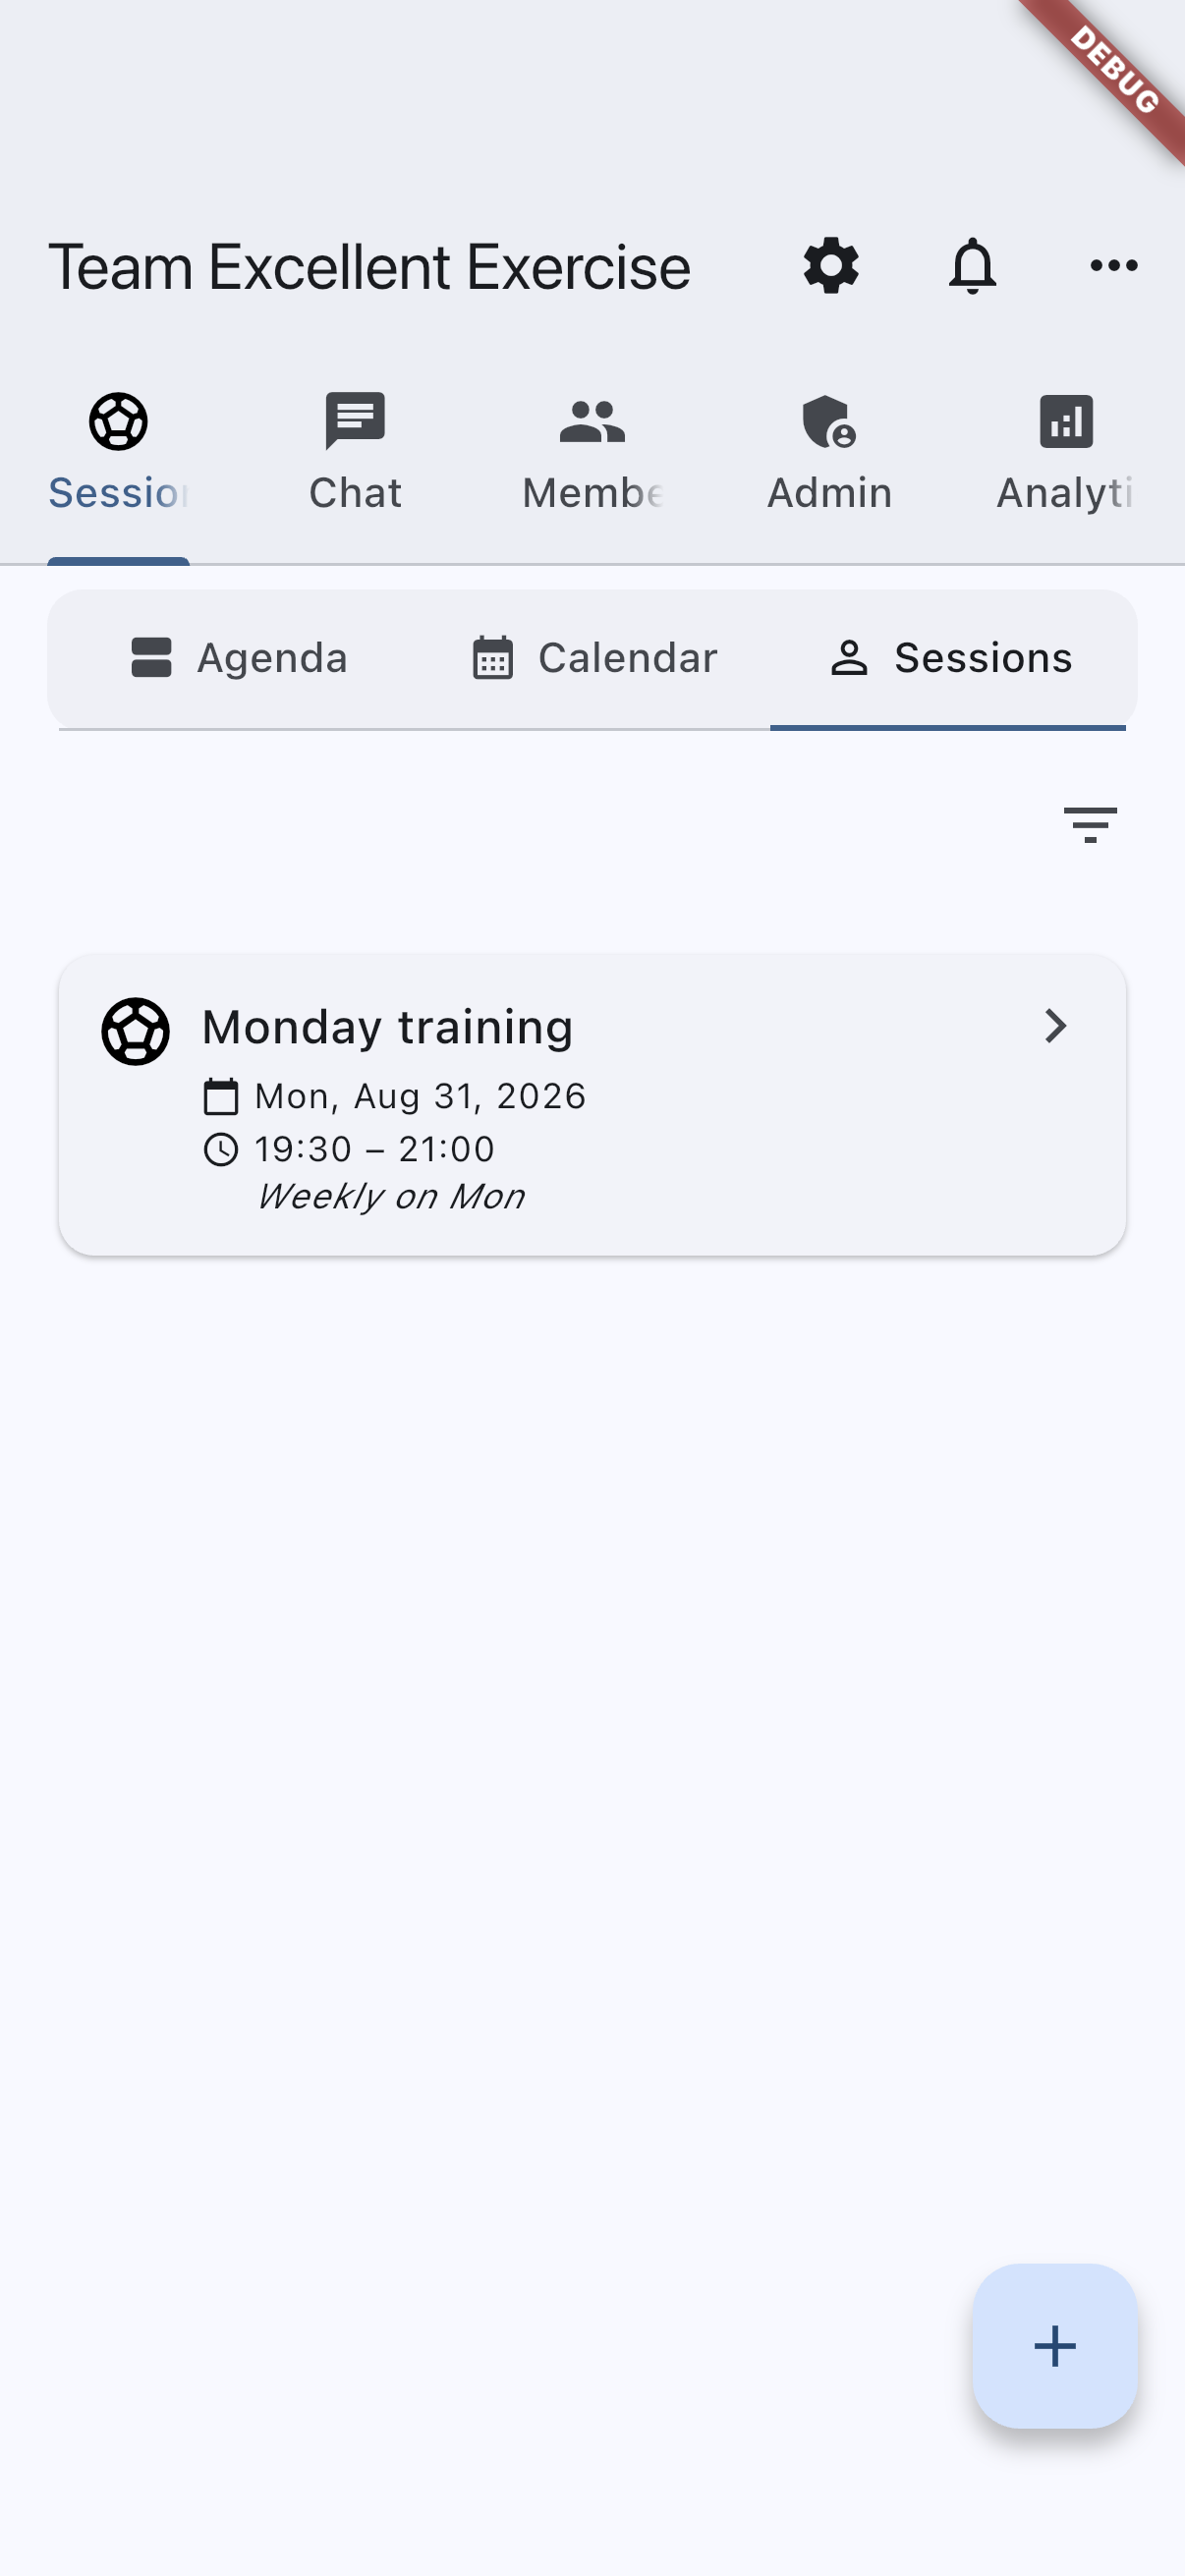
- Events is your own roster: every event in the team — sessions, activities and Info events — as compact summary cards.
Cards on the Agenda and Calendar sub-tabs do not name the team — the page header above them already does, and every event here belongs to that team. The name stays on the home screen, where a card can come from any of your teams, and on an event’s own page.
The + on the Agenda sub-tab opens a menu of what you may start here: New event when you are allowed to create events, and New Quick Quiz when the team allows those. It shows only what you can actually do, and disappears entirely when that is nothing.
group-events-calendar-android.pnggroup-events-calendar-ios.png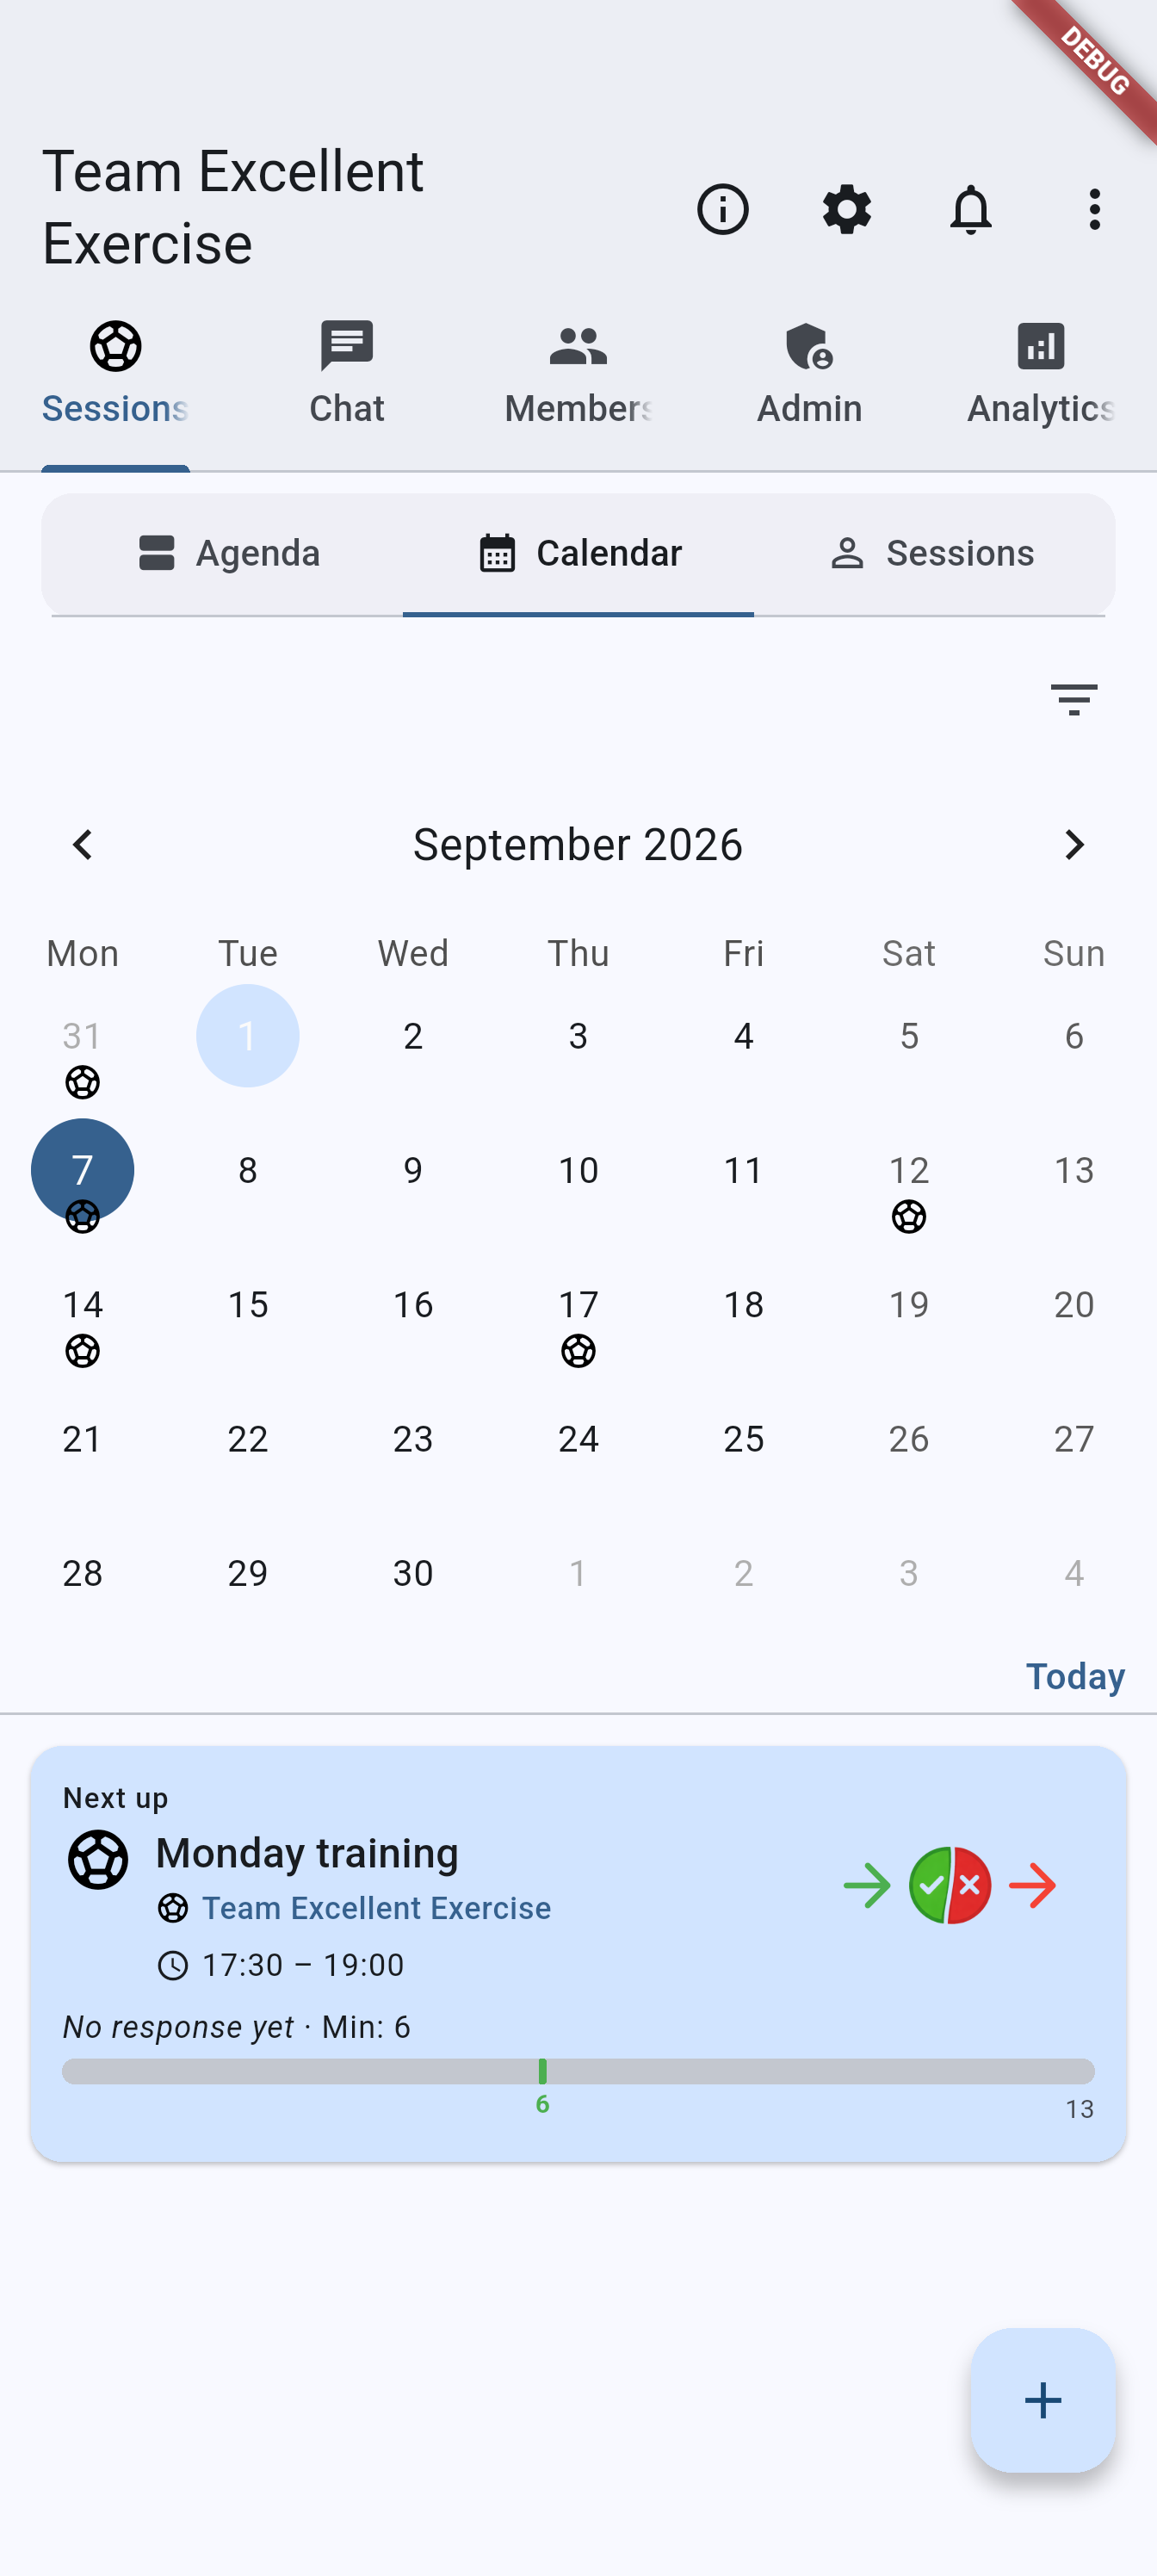
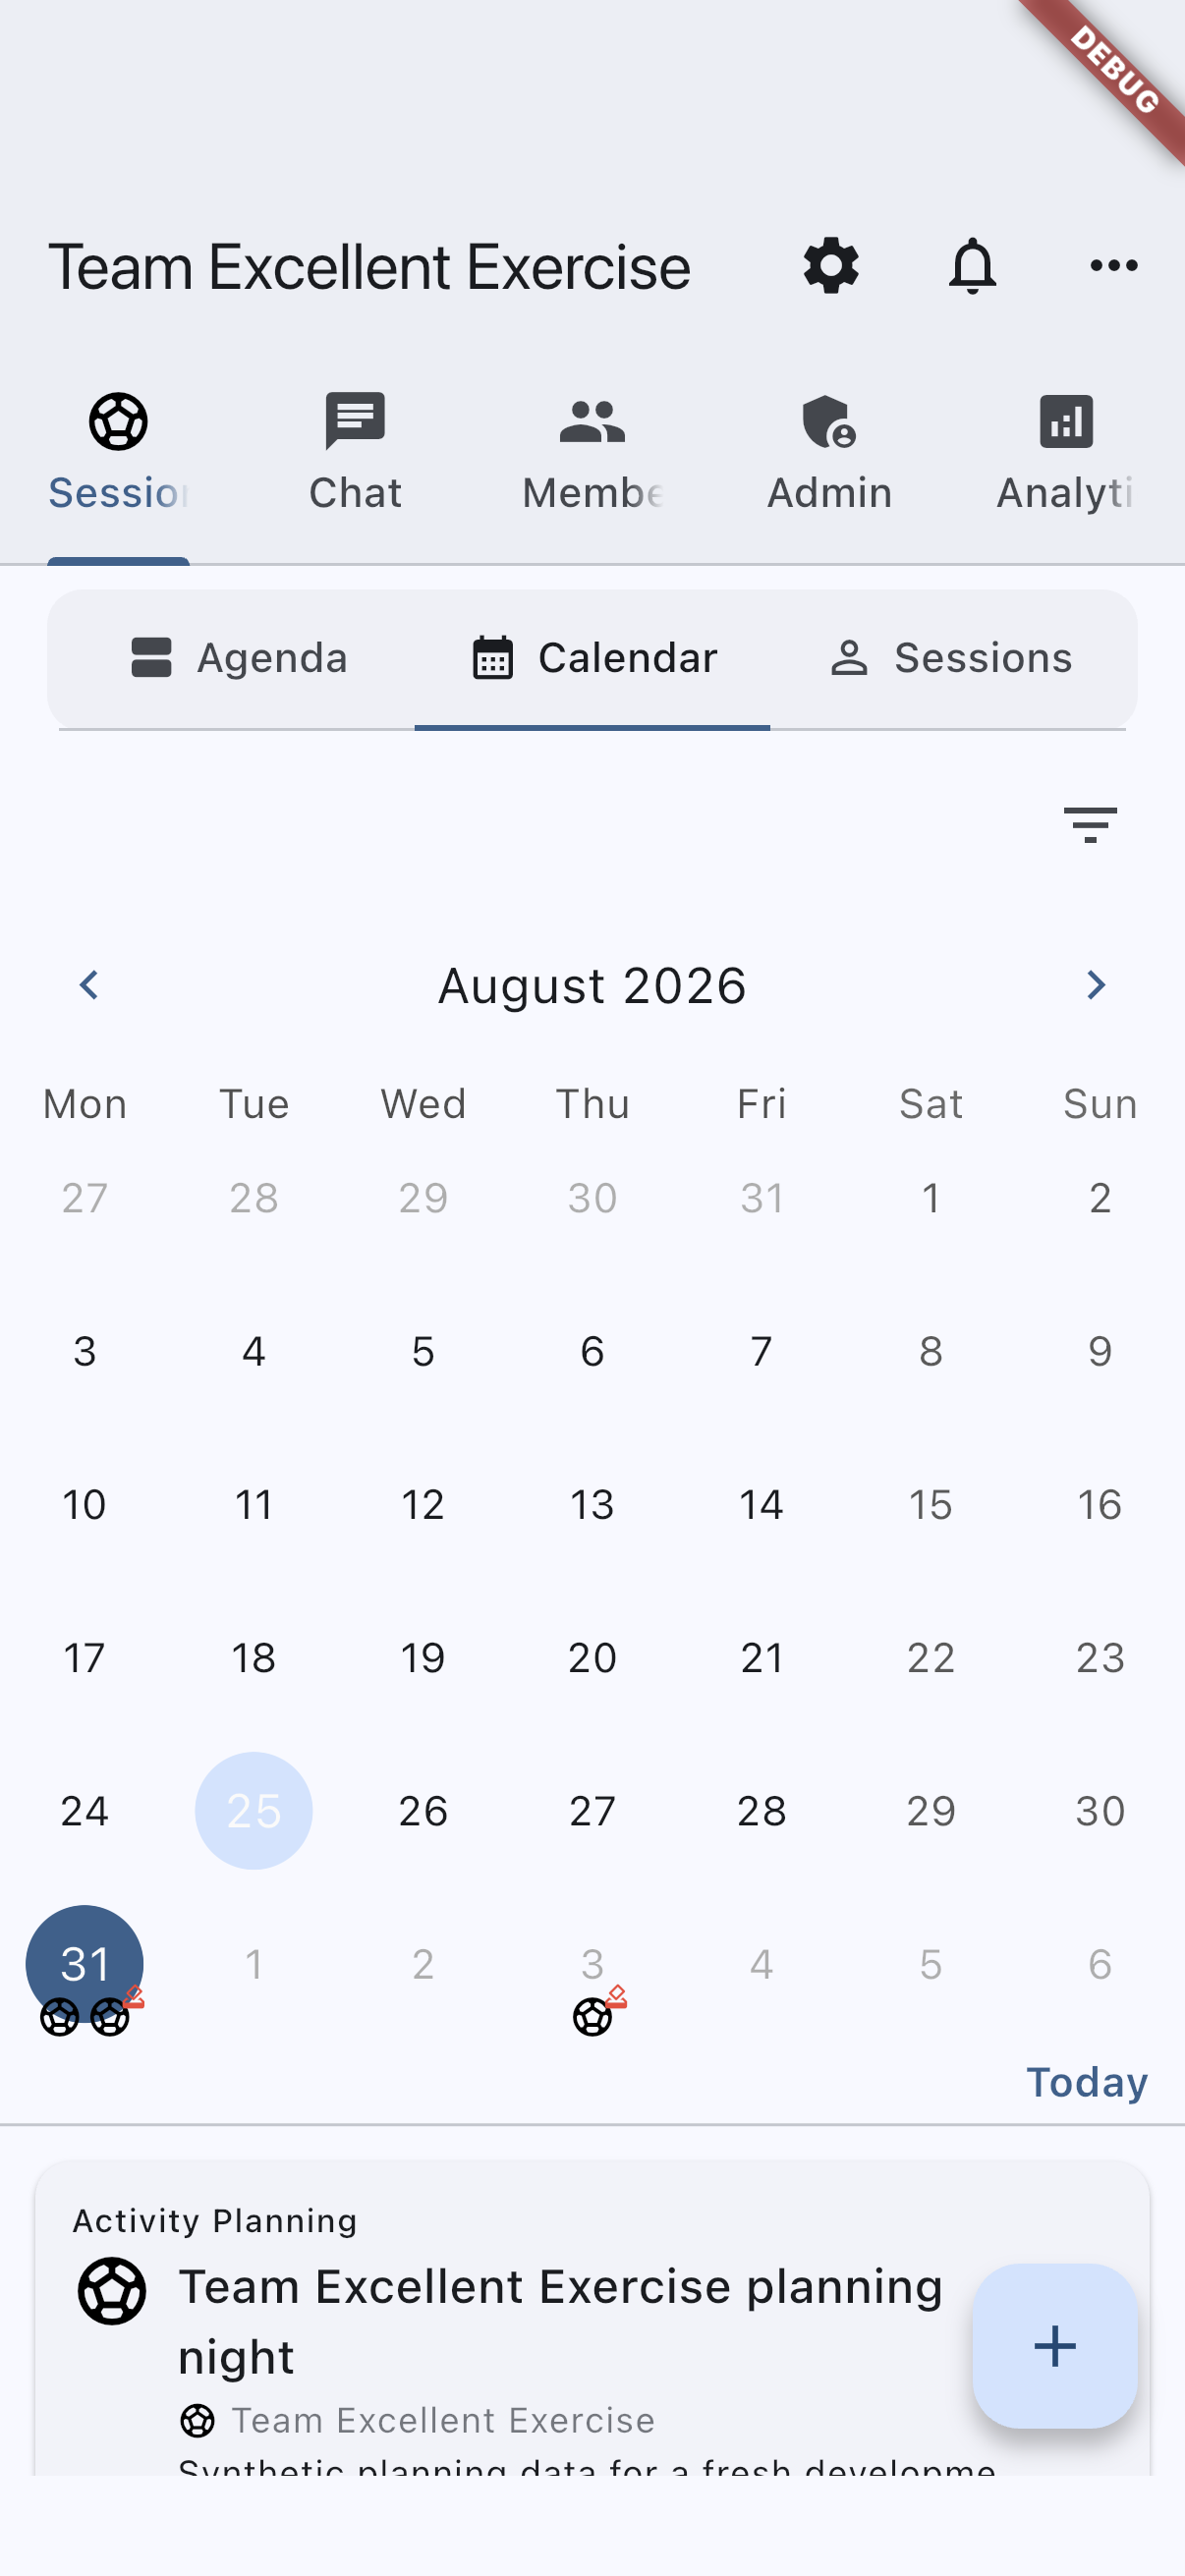
The Calendar sub-tab, showing the team's schedule by month.
group-events-list-android.pnggroup-events-list-ios.png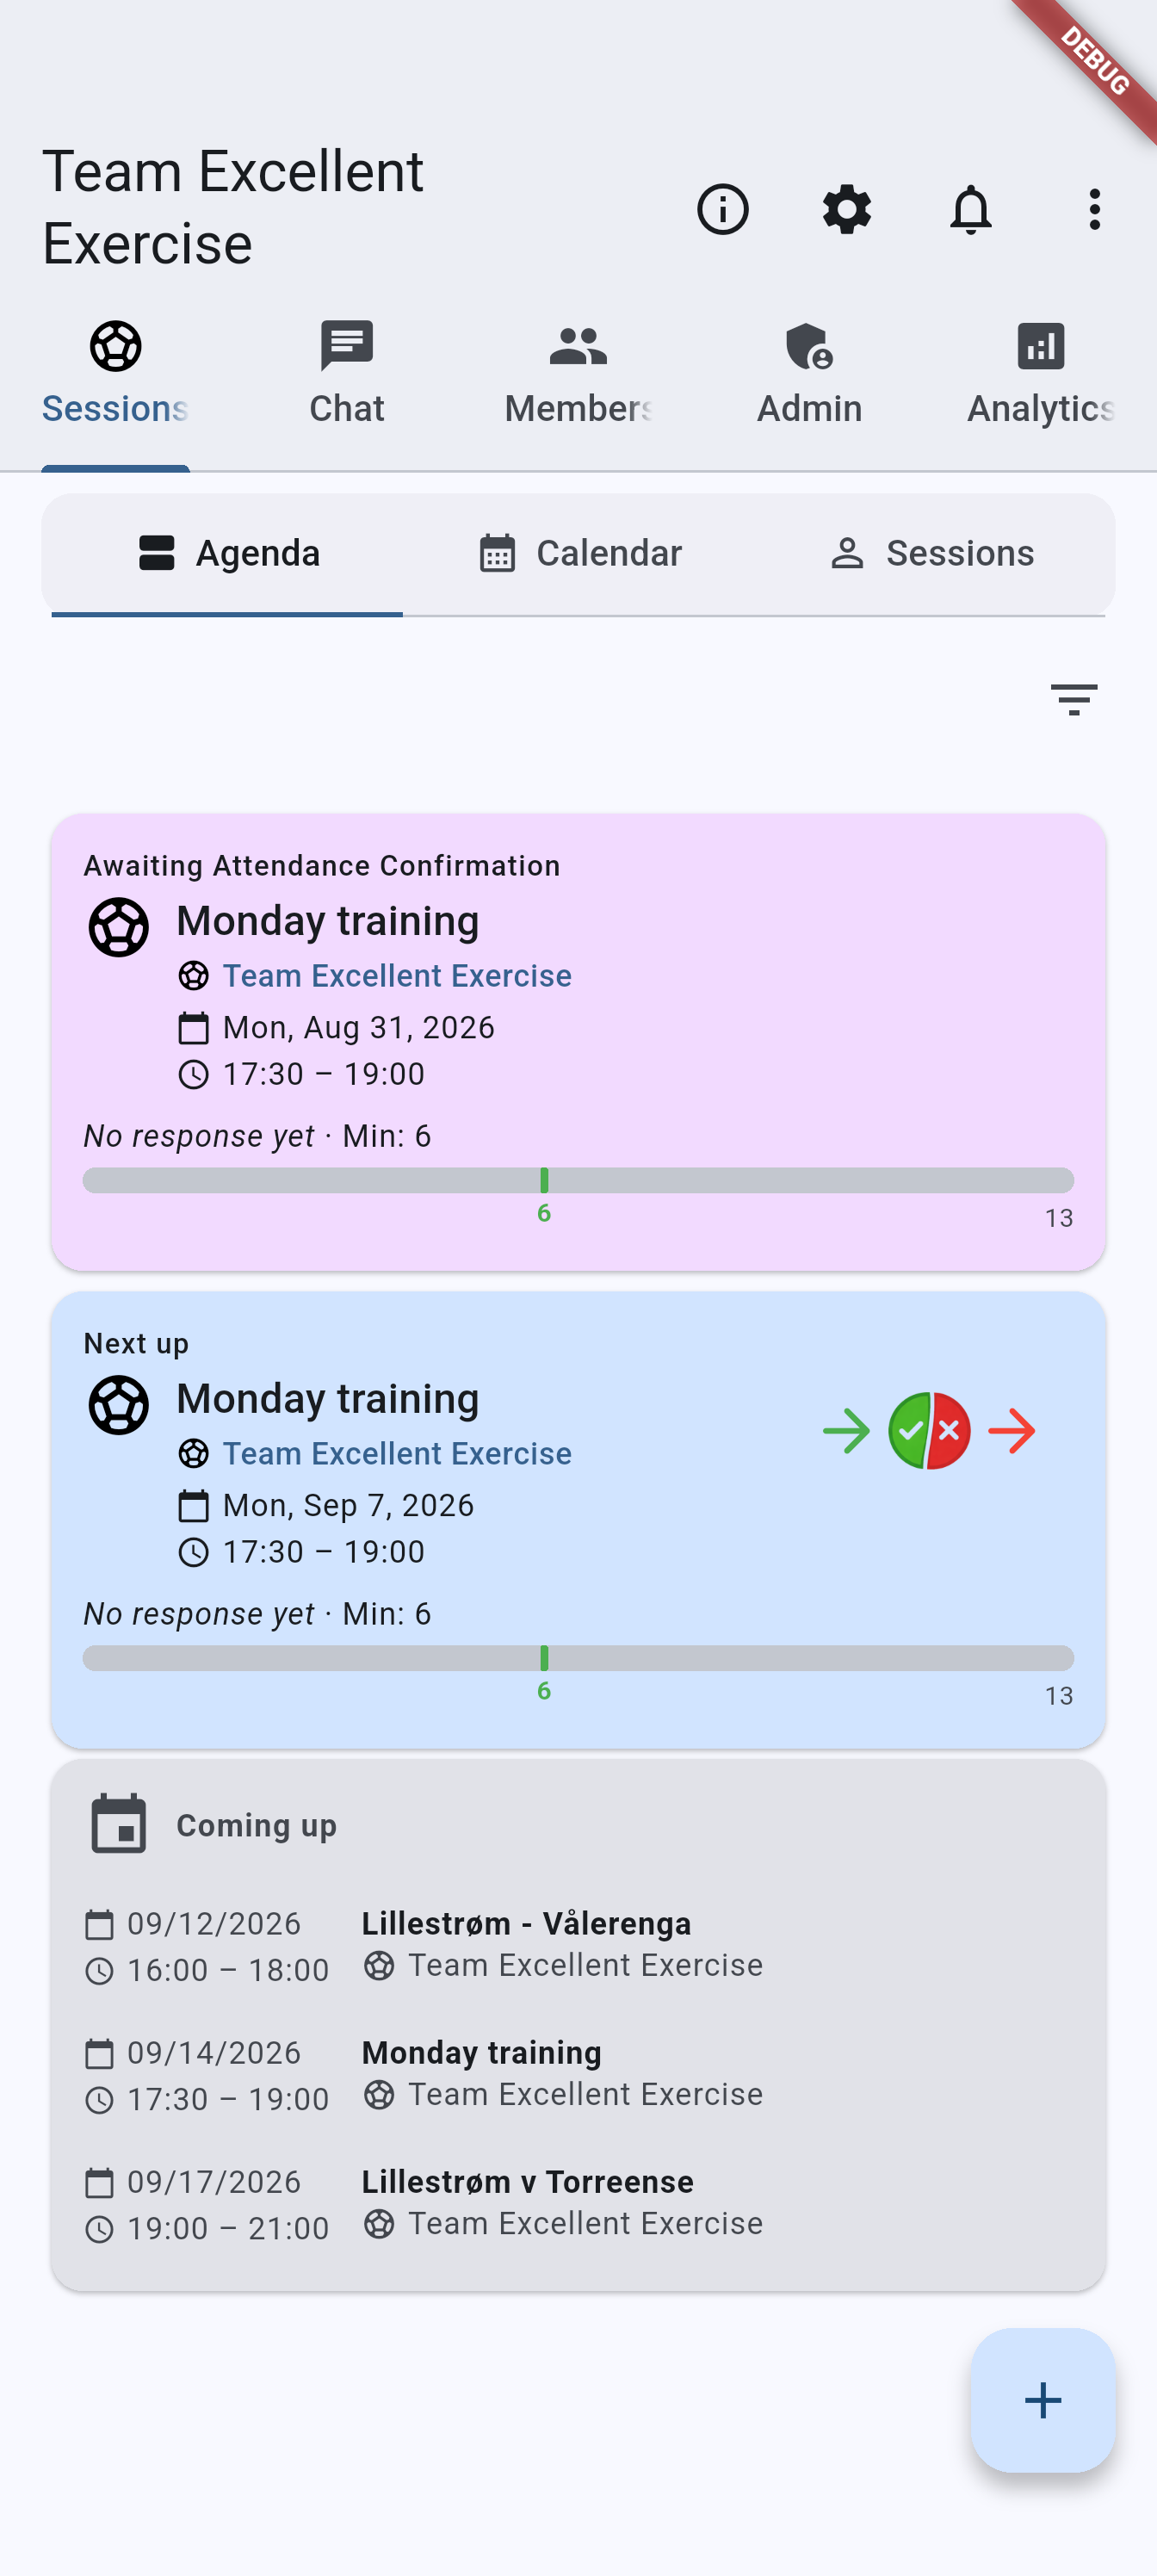
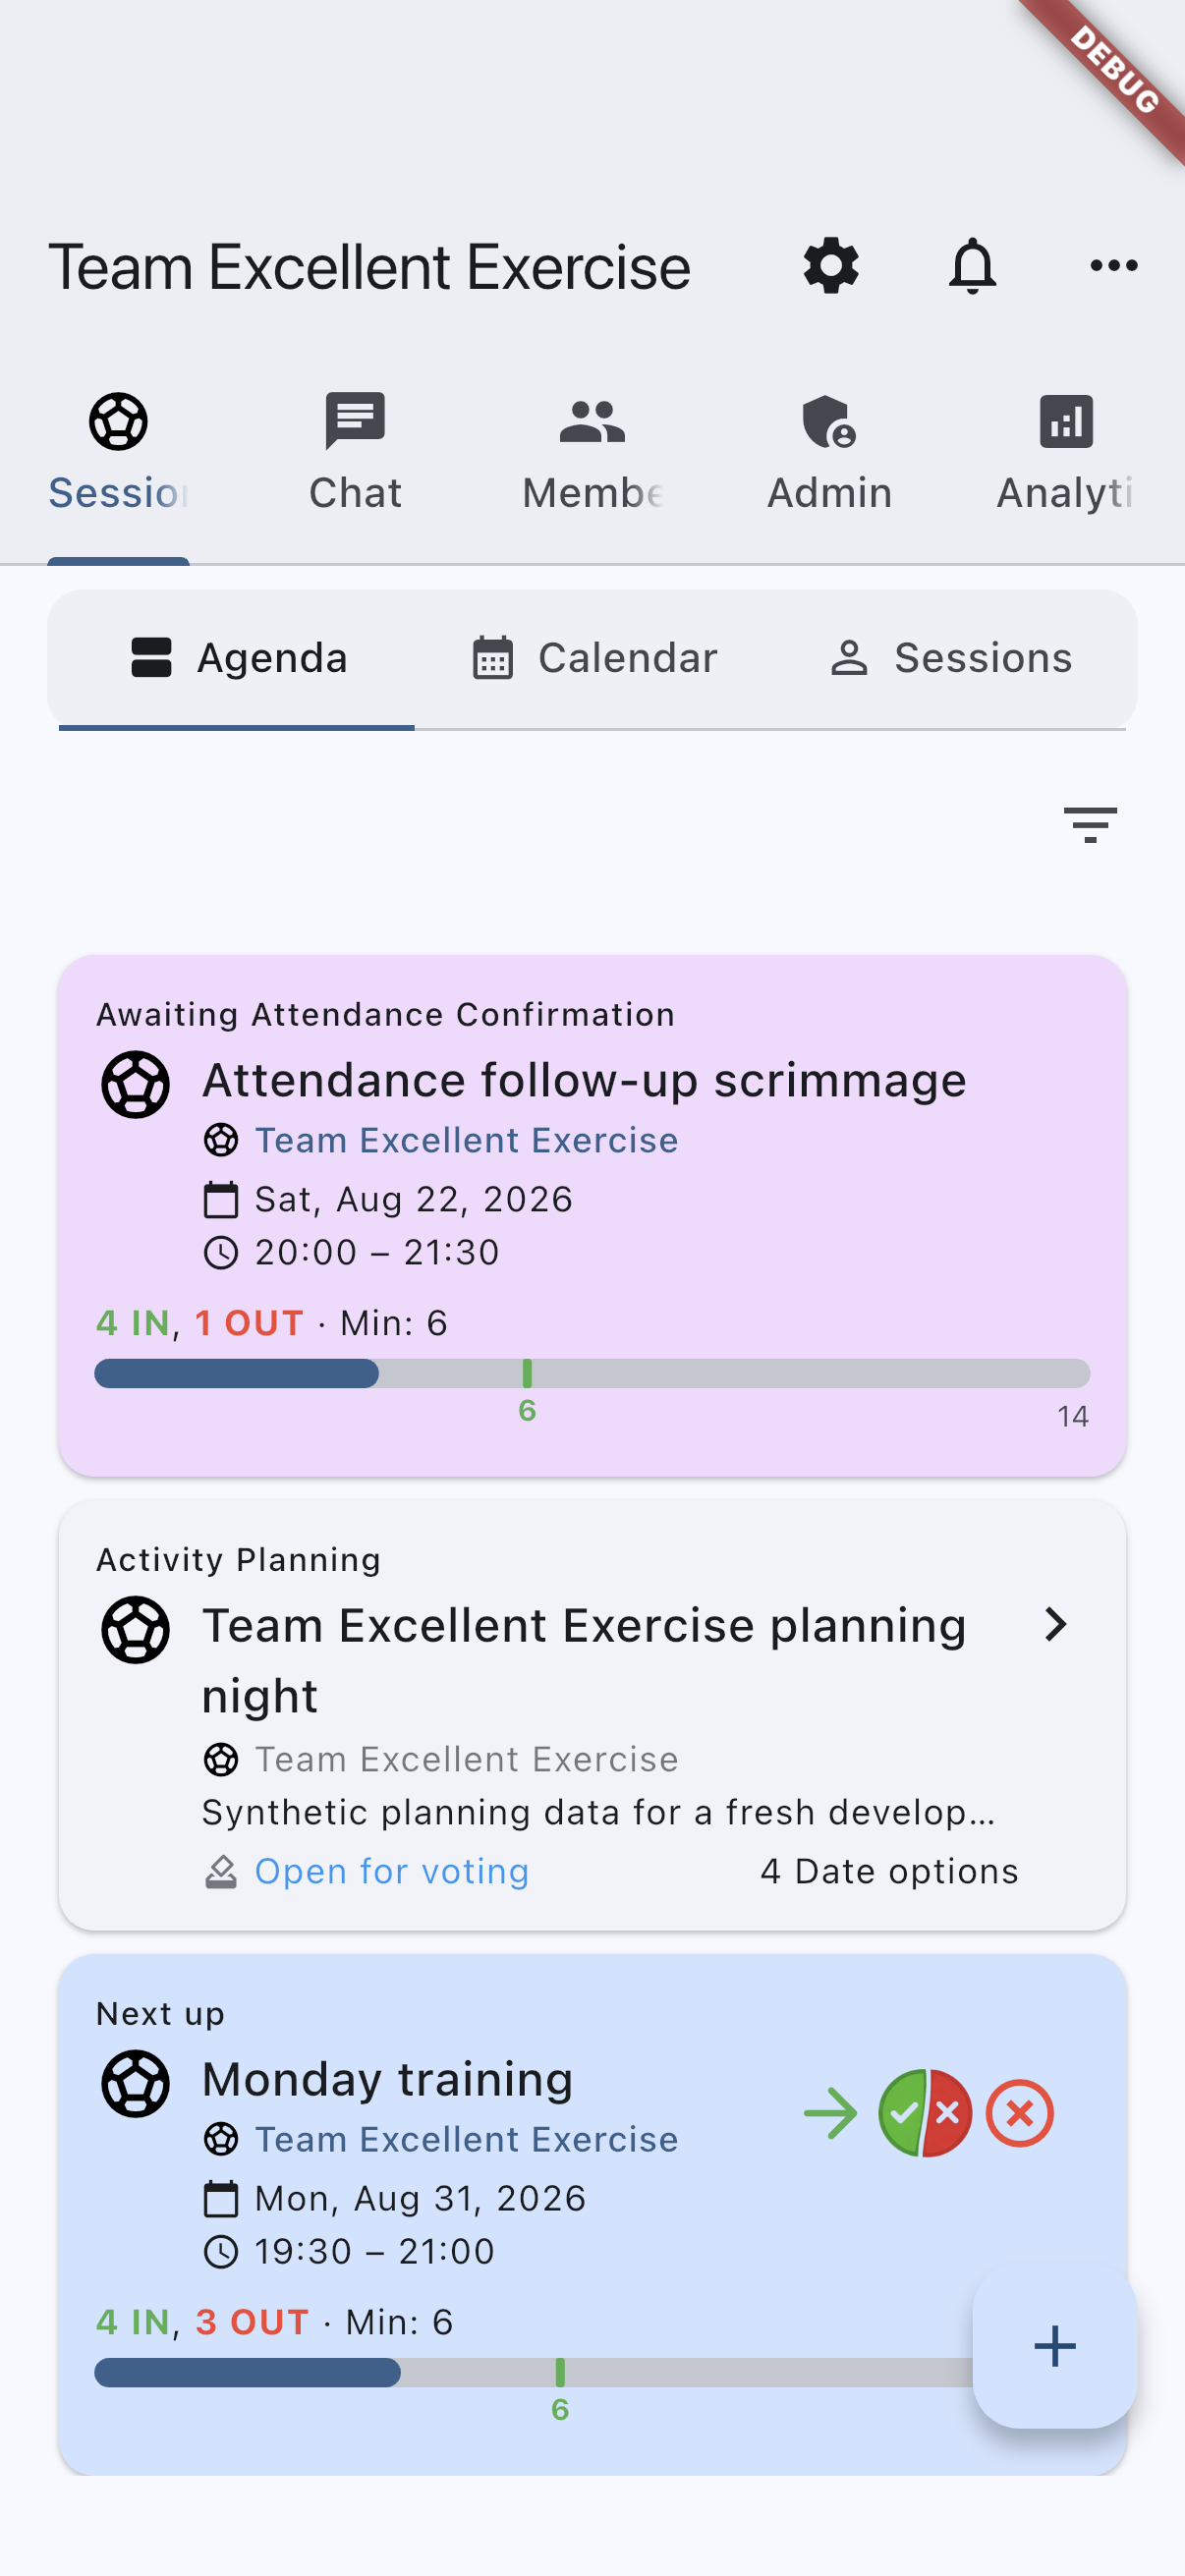
The Agenda sub-tab with its filter row.
group-events-my-events-android.pnggroup-events-my-events-ios.png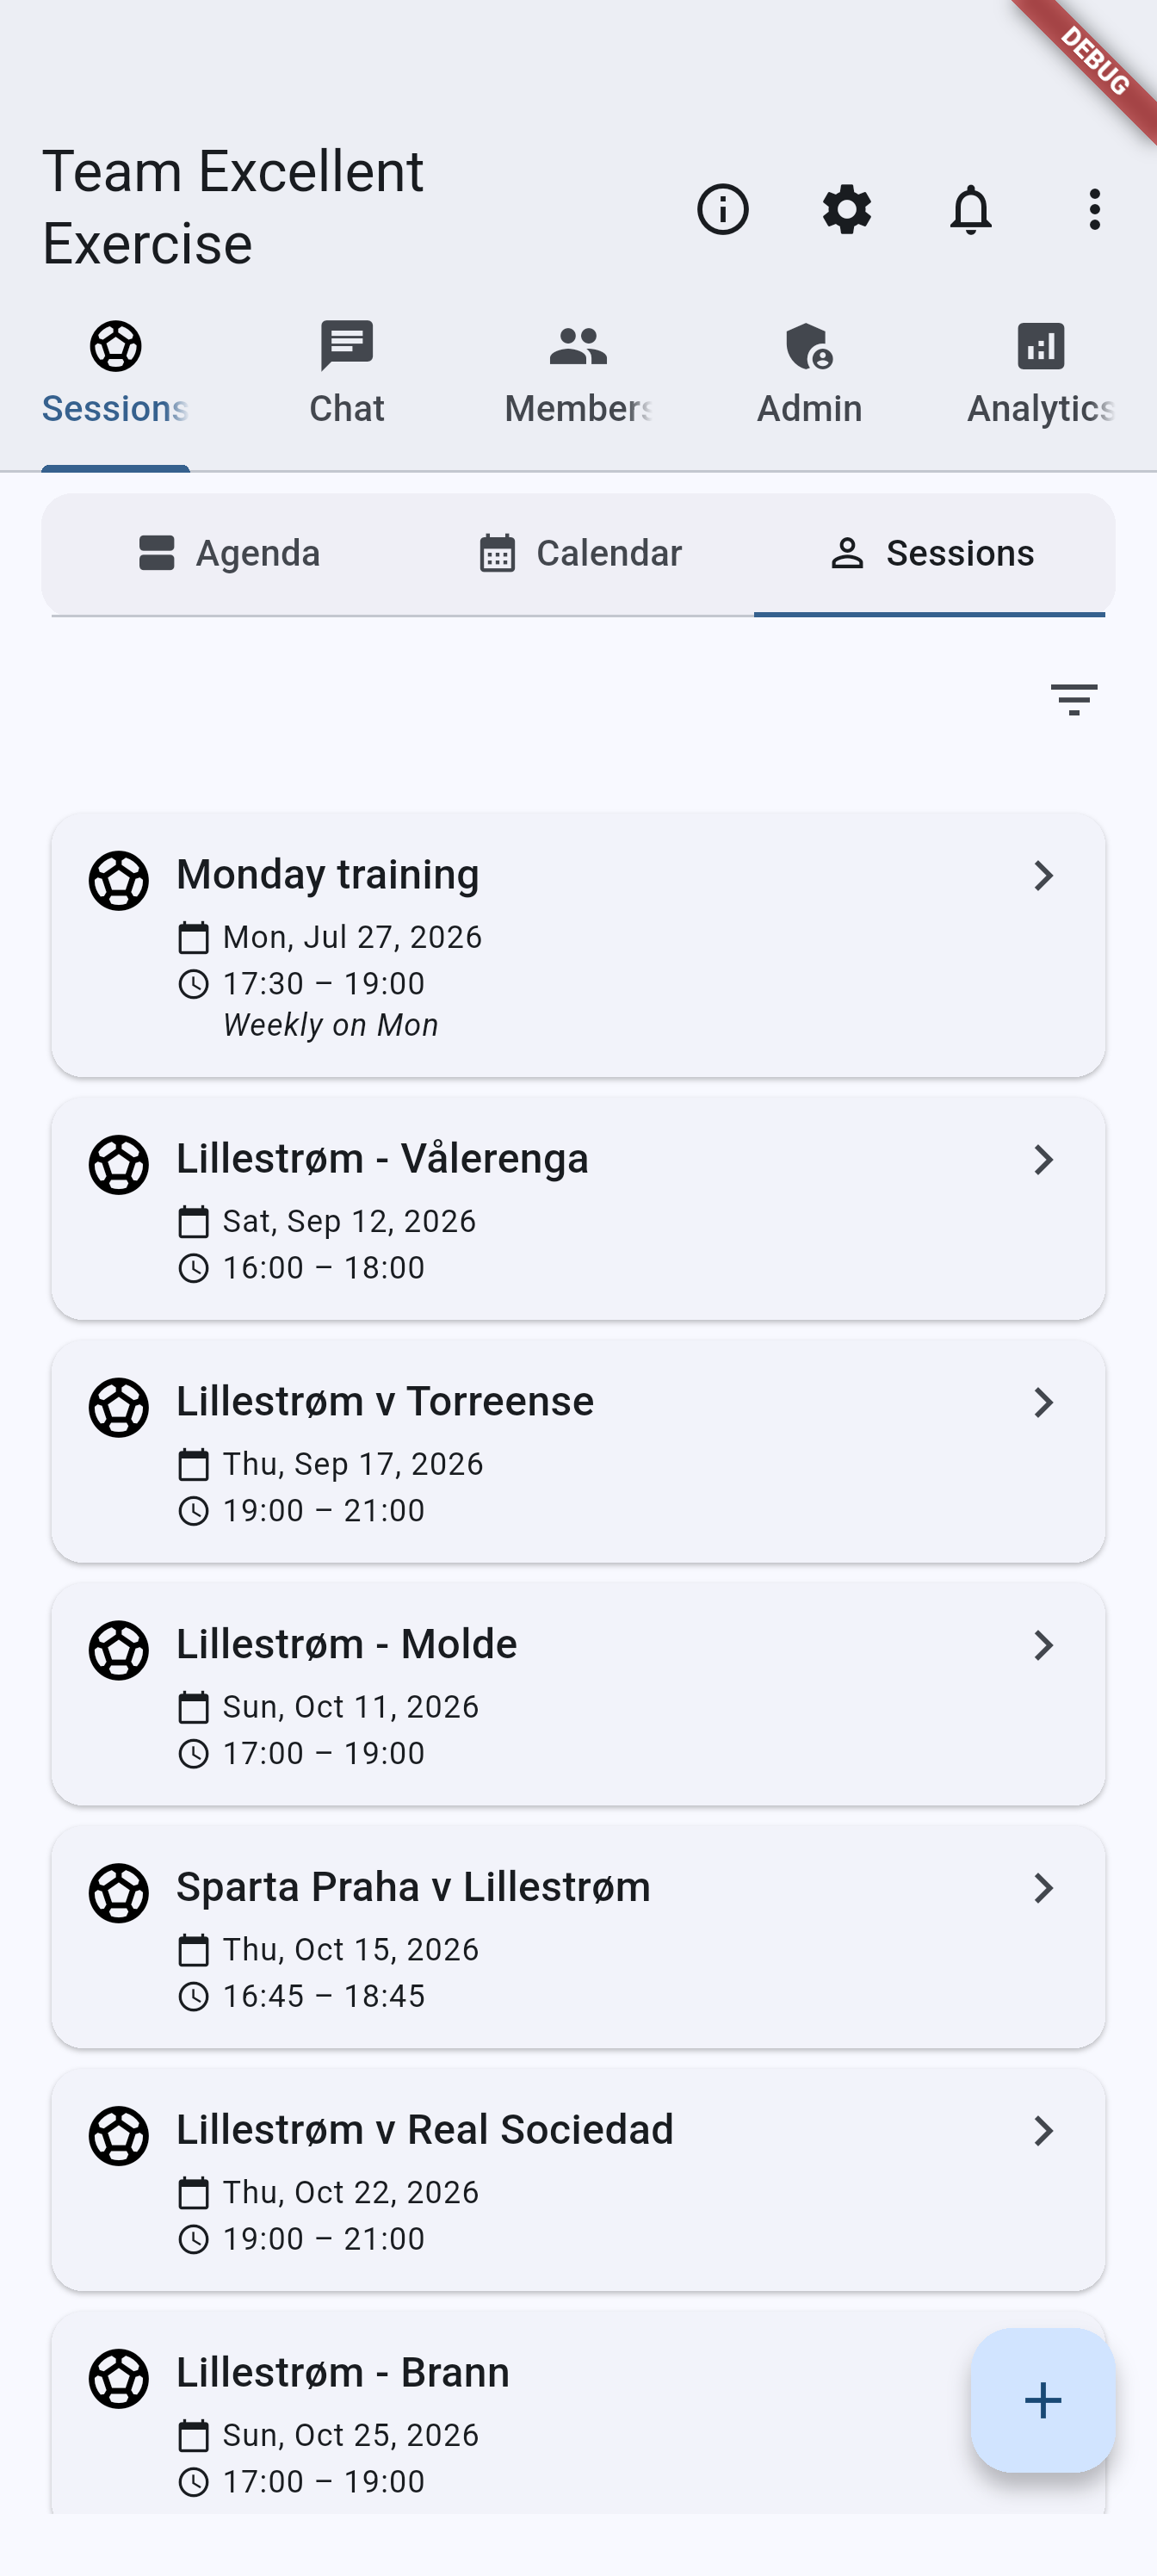
The Events sub-tab, listing every event in the team as summary cards.
Show or hide expired events
The Calendar and Events sub-tabs share a filter row with three options:
- Default — only events that still have something ahead of them.
- Expired events — only the events that have finished.
- All — both, with a Past sessions/Past activities caption separating them on the Sessions sub-tab.
An event counts as expired once every one of its occurrences has ended, so a repeating session that still has dates to come stays under Default — including the dates it has already been through. Picking Expired events on the calendar jumps you to the most recent past event rather than leaving you on an empty today, and hides the activity-planning vote markers, which only ever apply to open votes.
The two sub-tabs share one choice, so switching between them keeps it. It resets to Default when you leave the team page.
Filter the Agenda sub-tab
The Agenda sub-tab has the same pinned filter row as the home screen’s Agenda tab. It offers four options:
- Default — the sectioned overview described above.
- All upcoming — every upcoming event in this team as a flat, time-sorted card list.
- No response — all — only the upcoming events you have not answered yet.
- Attendance to confirm — occurrences waiting for attendance confirmation (populated for admins in Business-tier teams).
The per-team filters from the home screen are not offered here because the list is already scoped to a single team. As on home, any filter other than Default replaces the sectioned overview with a plain card list, long results are capped at the first 50 events with a notice, and the selection survives switching between sub-tabs but resets when you leave the team page.
View and respond to an event
Members use the event detail screen to:
- join or decline an occurrence,
- adjust guest counts when guests are allowed,
- review schedule, recurrence, and location,
- and inspect participant lists, where the team shows them.
When guests are enabled, each participant can only add guests up to that event’s configured per-member cap.
Admins also get extra actions such as editing the event, cancelling an occurrence, or managing invited members for activity-planning events.
In practice the member flow is:
- Open the event from the group list, home dashboard, or calendar view.
- Review the time, recurrence, location, and participant state.
- Join or decline the current occurrence.
- Adjust guests if the event allows them.
When an occurrence has already ended, the join/decline controls no longer stay active even though the event details and participant history remain visible.
Where a team has switched Show participants off — for all events, or for this one — members see how many are coming, the capacity gauge and their own answer, but not who the others are. Admins always see the full list. Individual members can also hide themselves; see Profile and security.
The numbers always count everyone, including anyone the list is not naming.
Special event types
- Activity-planning events are created from a winning activity planning and continue in the normal event flow after activation.
- Info events take no responses — see Info events.
- Events imported from a calendar subscription are ordinary activities or Info events. They appear in the same group lists and calendars, but admins do not edit them through the normal event menu because their dates and times are controlled by the imported feed.
Admin actions on a single occurrence
Group adminsOpening one date of an event gives admins a three-dot menu that acts on that occurrence rather than the whole series. What it holds depends on the plan, the team’s feature switches, and whether the date came from an imported calendar feed:
- Show check-in and Prize draw — the door and the end of the evening, both Business. A team that switched the feature off itself sees the entry dimmed; a team that only lacks the plan sees it labelled with the tier it needs and can still tap it to reach the upgrade screen.
- Copy This Occurrence Pro — described in the next section.
- Edit This Occurrence Pro — an override for this one date. Change its time, its location, or its details without touching the rest of the series. It disappears while the occurrence is cancelled.
- Cancel This Occurrence — calls off this date and leaves the remaining dates alone, with an optional reason members can read on the cancelled card. It is reversible: the menu then offers Reactivate This Occurrence in its place. Both are free on ordinary events; only a feed-imported occurrence needs Pro to be cancelled, because that is an override of the feed.
- Manage Members — offered on an occurrence that came out of an activity planning. Add group members who were not part of the vote, or remove someone from this event. The dialog says so when everyone is already added.
- Edit event and Delete event — the ordinary whole-series actions.
- Edit calendar subscription — takes the place of edit and delete on a feed-imported occurrence, because the subscription owns the schedule rather than the single date. See Calendar subscriptions.
Admins can also answer on behalf of a participant. Tapping a member in the participant list opens the same join dialog the member would see, so you can mark them as attending or declining and set their guest count for them — useful when someone tells you in person rather than in the app. The guest stepper honours the event’s per-member guest cap, and if the event is already full the app says so instead of over-filling it.
Copy an event
ProGroup admins on Pro or Business plans can duplicate an existing event from the admin actions menu (three-dot menu) on the event detail screen or the event view screen. On the event detail screen, tap Copy This Occurrence to open a pre-filled event form with:
- the original title (with a [Copy] suffix),
- icon, color, description, location, participant limits, guest settings, notifications, decision deadline, and the public/private setting.
When copying from the event detail screen, date and time reset to tomorrow 18:00–19:00 and recurrence is turned off so you can pick fresh scheduling. The Copy This Occurrence item appears at the top of the admin menu for quick access.
When copying from the event view screen, recurrence settings are also preserved, giving you a ready-to-use duplicate of the full schedule.
The copy is saved as a brand-new event using the normal create flow.
On free plans the menu item is visible but shows a Pro feature label. Tapping it opens the subscription screen instead.
On the home screen and in the group event tab, next-up, active, cancelled, and awaiting-attendance cards show the group’s icon before the group name so related items are easier to scan.
Cards with a short status label, such as Next up, Cancelled, or Awaiting attendance confirmation, place that label above the event title so the main icon and title stay visually aligned.
Attendance confirmation
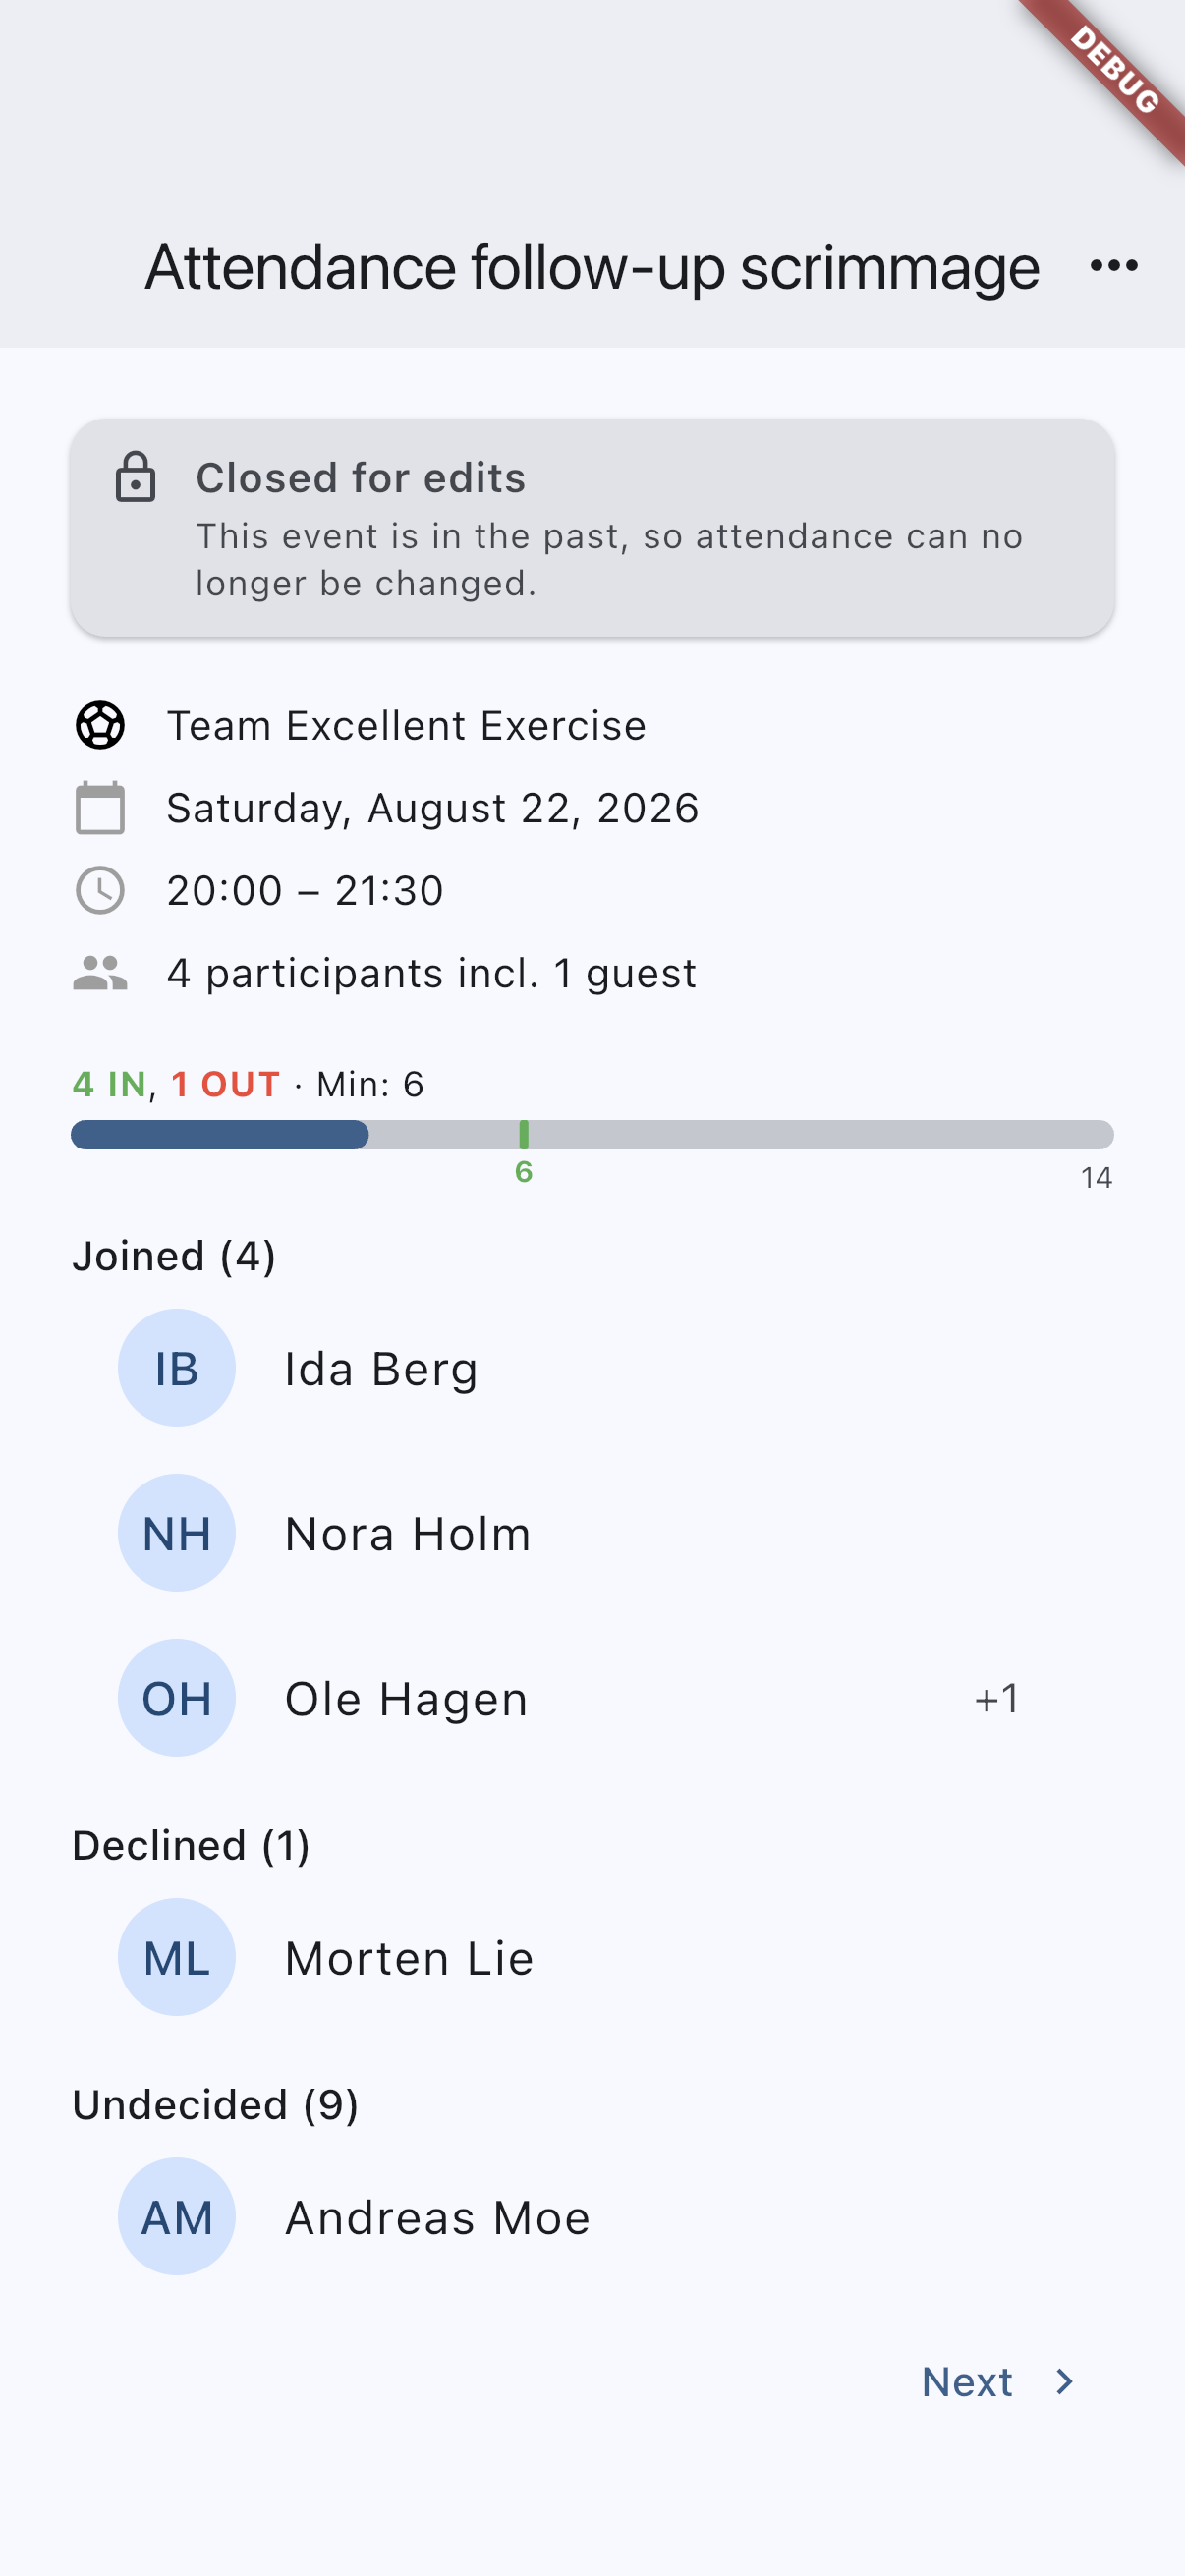
BusinessAttendance confirmation is an admin-only workflow for Business-tier teams. It becomes available as soon as an occurrence starts, which makes it useful for a roll call at the beginning of the event as well as for follow-up after it ends.
RSVP status and confirmed attendance are different things. Members can join an event before it happens, while admins can confirm actual attendance once the occurrence has started.
- The awaiting-attendance card appears for eligible admins on the home screen and in the group event list as soon as the occurrence starts.
- Opening that card takes the admin directly to the attendance confirmation screen.
- The screen displays the event’s own icon and color at the top, alongside the event title, group name (shown with the group’s icon), date, and time.
- A live attendance summary is shown above the confirmation button, and the same details appear in the pre-save confirmation dialog.
- The participant list stays flat and alphabetical so the admin can move straight down the roster.
- Each row can be marked as attended, declined, or left unanswered, and guest counts can be adjusted for attendees when guests are allowed.
- The overflow menu (three-dot icon) lets the admin mark the occurrence as cancelled. Confirming the cancellation deletes all attendance data and optionally records a reason. The screen navigates back automatically.
- After attendance is confirmed, the special card disappears and the occurrence follows the normal in-progress flow.
QR check-in at the door
BusinessFor teams running a staffed door, participants can check themselves in instead of an admin working down the roster.
- Open the occurrence, then choose Check-in from the three-dot menu. The item is admin-only. It offers two modes.
- Live check-in turns the device into a staffed desk: it shows the code full-screen, and when somebody scans, their name and photo appear on the desk. Whoever is working the door sets the guest count and confirms the arrival there — the participant’s own phone only shows them their status and waits. Closing the card returns to the code, ready for the next person.
- Static check-in is the printable sheet, in two shapes: Full page, with the event name, venue and date above the code and the InOrOut logo in the corner, for a wall or a door; and Small, with just the event name and the code, for a reception desk. Each participant confirms their own arrival and guests on their own phone.
- Either way, participants scan the code with their phone camera, which opens InOrOut on a check-in screen.
- That screen shows a large green tick, an orange badge or a red cross together with the participant’s name and photo, so whoever is working the door can confirm at a glance that the phone belongs to the person holding it.
- Orange means already checked in, and names the time they arrived. A code that has been spent stops looking like a fresh green tick, so it cannot be handed to a second person and waved through.
- A member with a spot confirms how many guests they actually brought. Registering three and arriving with one frees the other two seats, and the team’s admins are notified.
- Bringing more guests than you registered works only when the event has the room for them. When it does not, the door is told how many of the party can still come in — so the group can decide among themselves who joins — and nobody is checked in until the number comes down.
- A member without a spot still gets in when the event has room — whether they never answered, declined earlier, or are marked as on time off. Turning up counts for more than an RSVP from last week.
- The exception is a waiting list with people queued: while those offers can still go out, the seats belong to the queue — for extra guests just as much as for a walk-in — and whoever is standing at the door is told so.
- Everyone who checks in appears on the attendance confirmation screen already marked, with a small badge on their row, so the admin only has to handle whoever did not scan.
The printed code stays valid for the whole occurrence, so a sheet can go up in advance. Anyone who photographs it could check in from elsewhere, which is why the door screen shows the participant’s name for a person to check. A code that has already been used turns orange rather than green and names the original arrival time, so a screenshot passed on to somebody else does not read as a fresh admission.
Check-in opens two hours before the start — or at the event’s Doors open time when it has one — and closes an hour after the end. A doors time can bring the opening in as easily as push it out: set it to half an hour before the start and the desk stays shut until then. The Live check-in card stays greyed out until then, because a desk opened earlier would show a code that nothing can scan yet — the printed sheet is the one you prepare in advance. A photographed Live check-in code keeps working only while that desk is open; once it closes, scanning falls back to ordinary self check-in.
live-checkin-desk-android.pnglive-checkin-desk-ios.pngRecommended capture: the Live check-in desk with a scanned participant's name and photo on the card.
static-checkin-sheet-android.pngstatic-checkin-sheet-ios.pngRecommended capture: the static check-in sheet in Full page shape, with event name, venue, date, and the InOrOut logo.
Prize draws
BusinessA draw can be attached to an event, so the winners are picked from the people who turned up. See Prize draws.
Recurrence and advanced features
- Free tier supports weekly and biweekly recurrence only.
- Paid tiers unlock full recurrence rules.
- Occurrence overrides are available on paid tiers and can also change the location for a single date without changing the whole event.
- Decision deadlines are also gated by plan and by group settings.
- A decision deadline needs a minimum attendance. Until one is set, the deadline field is shown but cannot be changed, and clearing the minimum removes the deadline. The deadline never closes responses: it only confirms or cancels the event.
Occurrence-level edits are for one specific date only. They are useful when one session starts later than usual or temporarily moves to another location without changing the whole recurring schedule.
Daylight saving
A repeating event keeps its clock time when the clocks change. A session at 19:00 is still at 19:00 the week after the country moves off summer time, not 18:00. The event remembers the time zone it was created in, so this holds even if you are travelling when you edit it.
event-form-create-android.pngevent-form-create-ios.png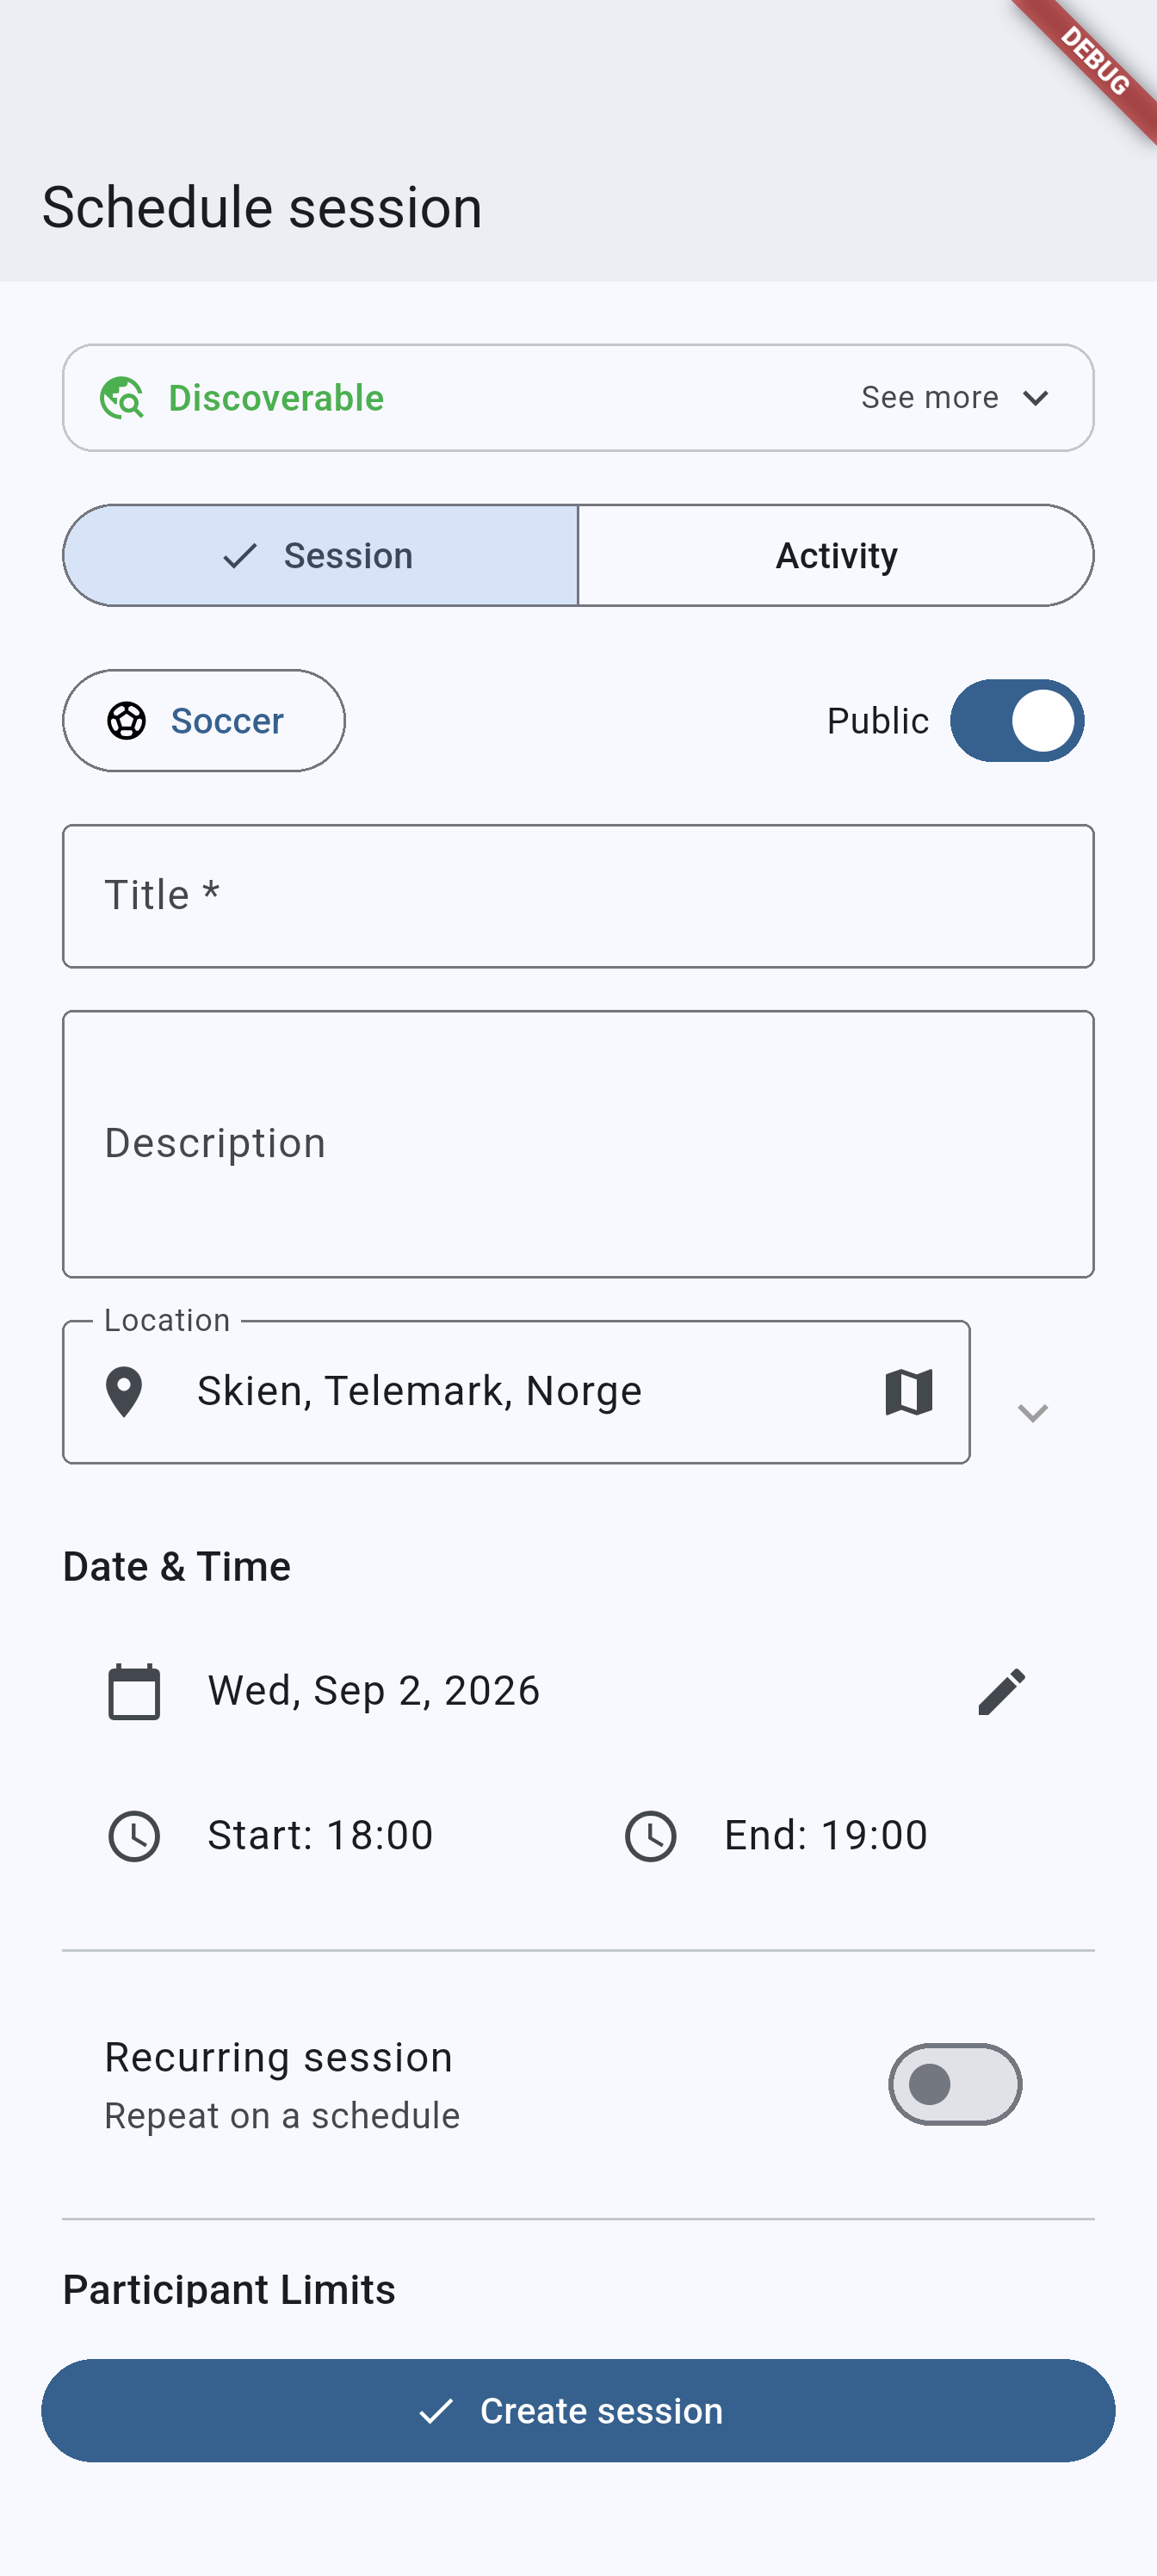
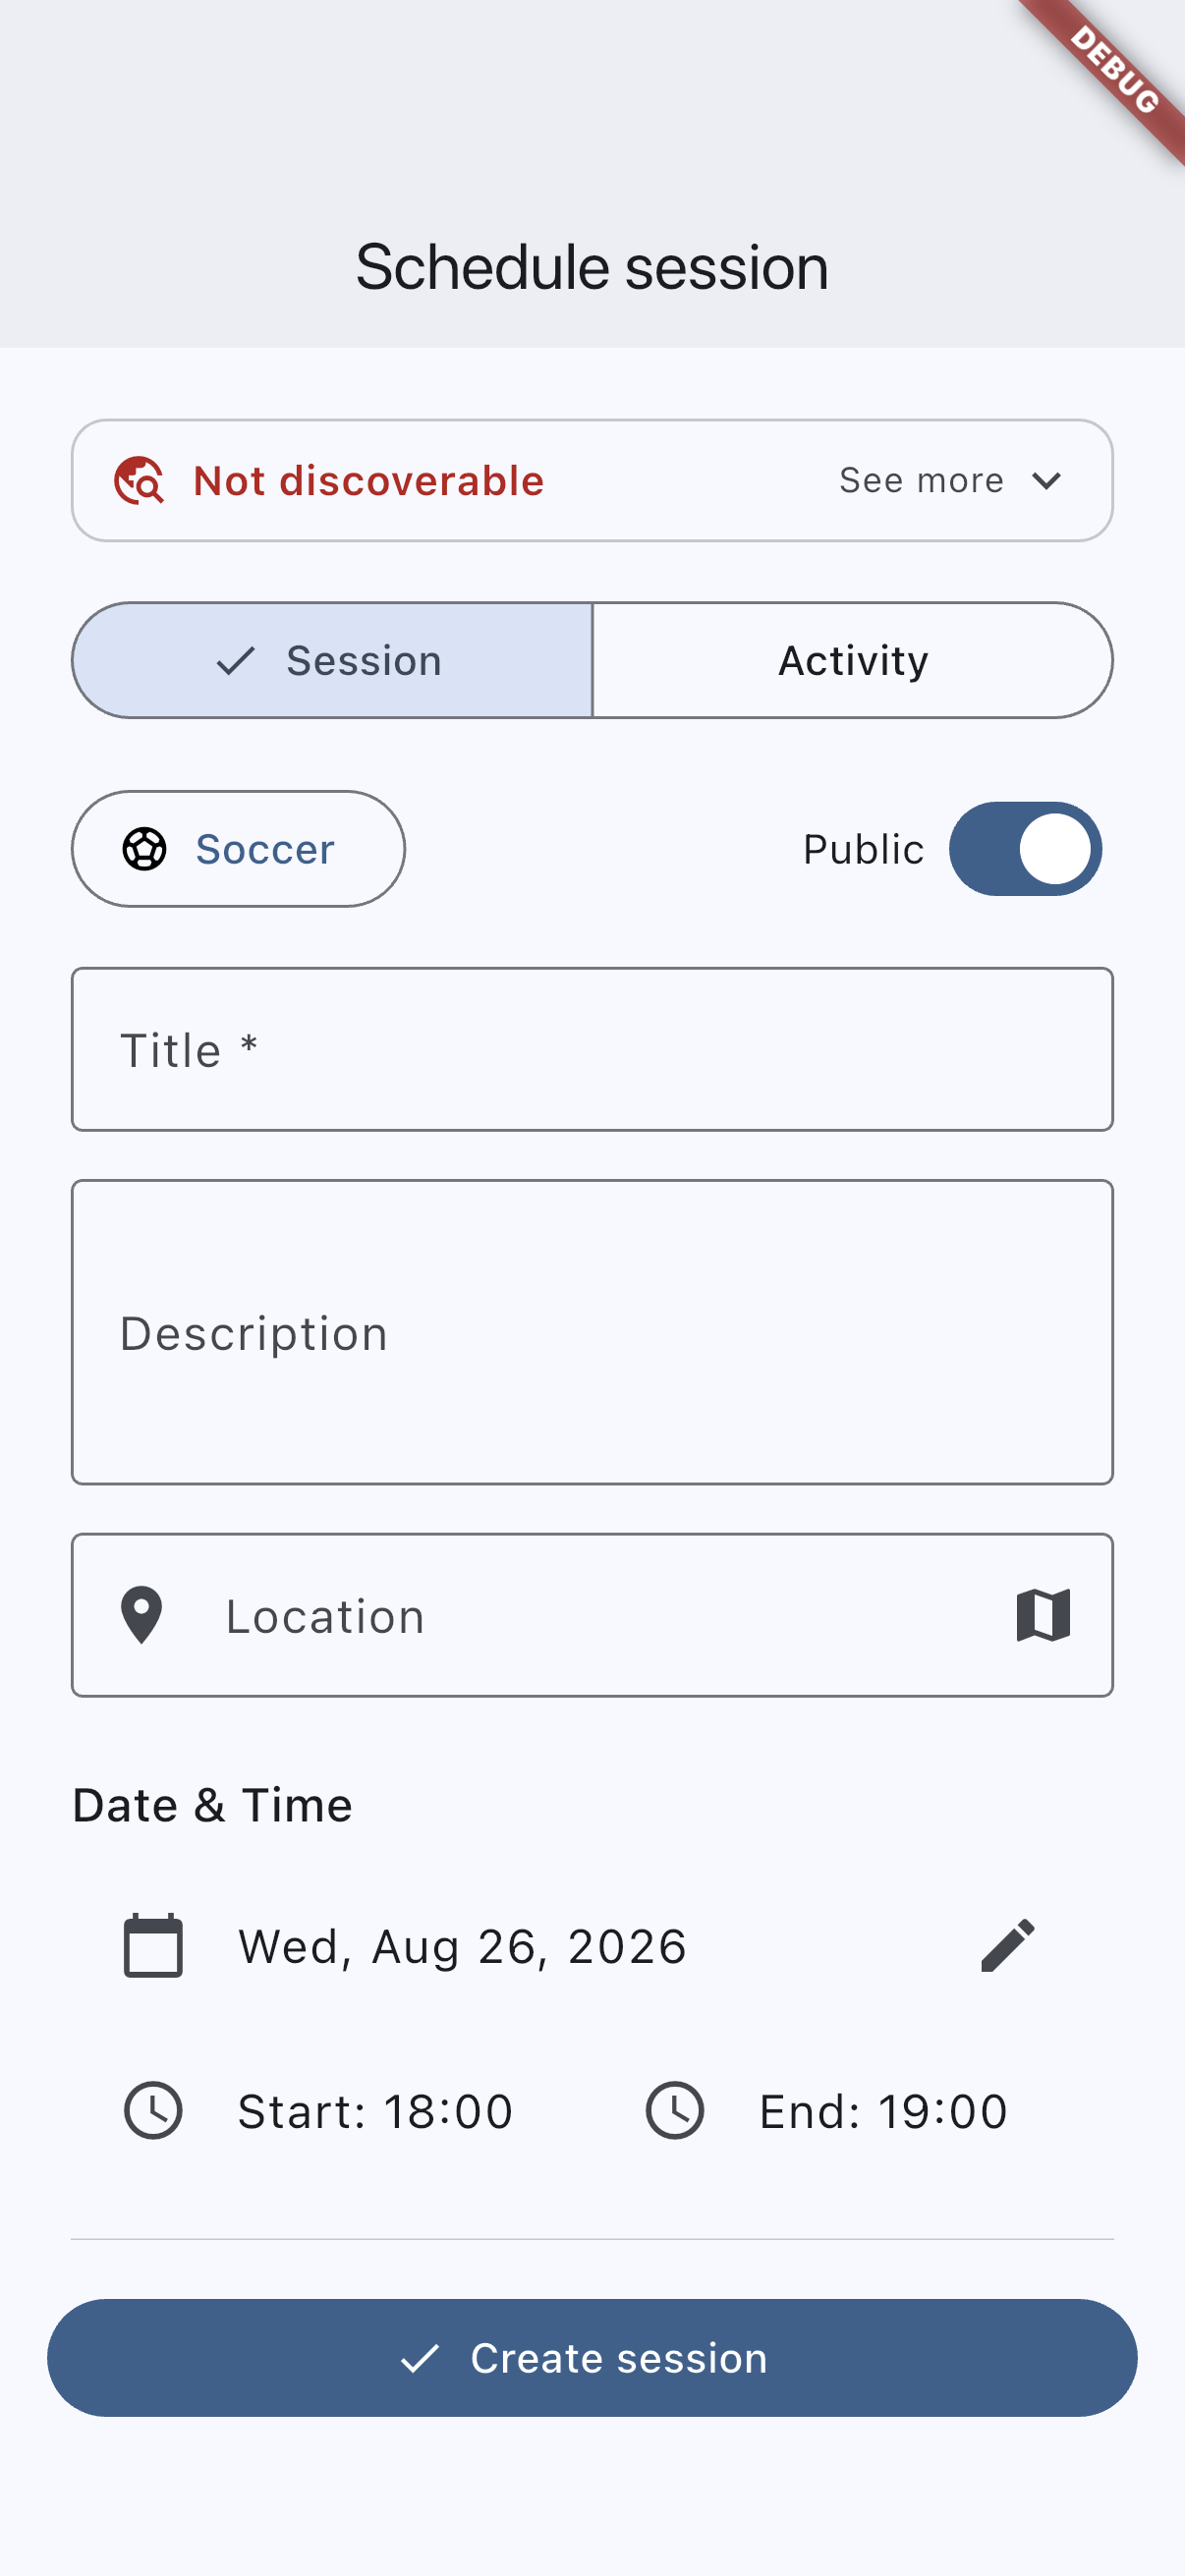
Event form in create mode showing the event type toggle, icon, title, location, date, and participant fields.
event-detail-rsvp-android.pngevent-detail-rsvp-ios.png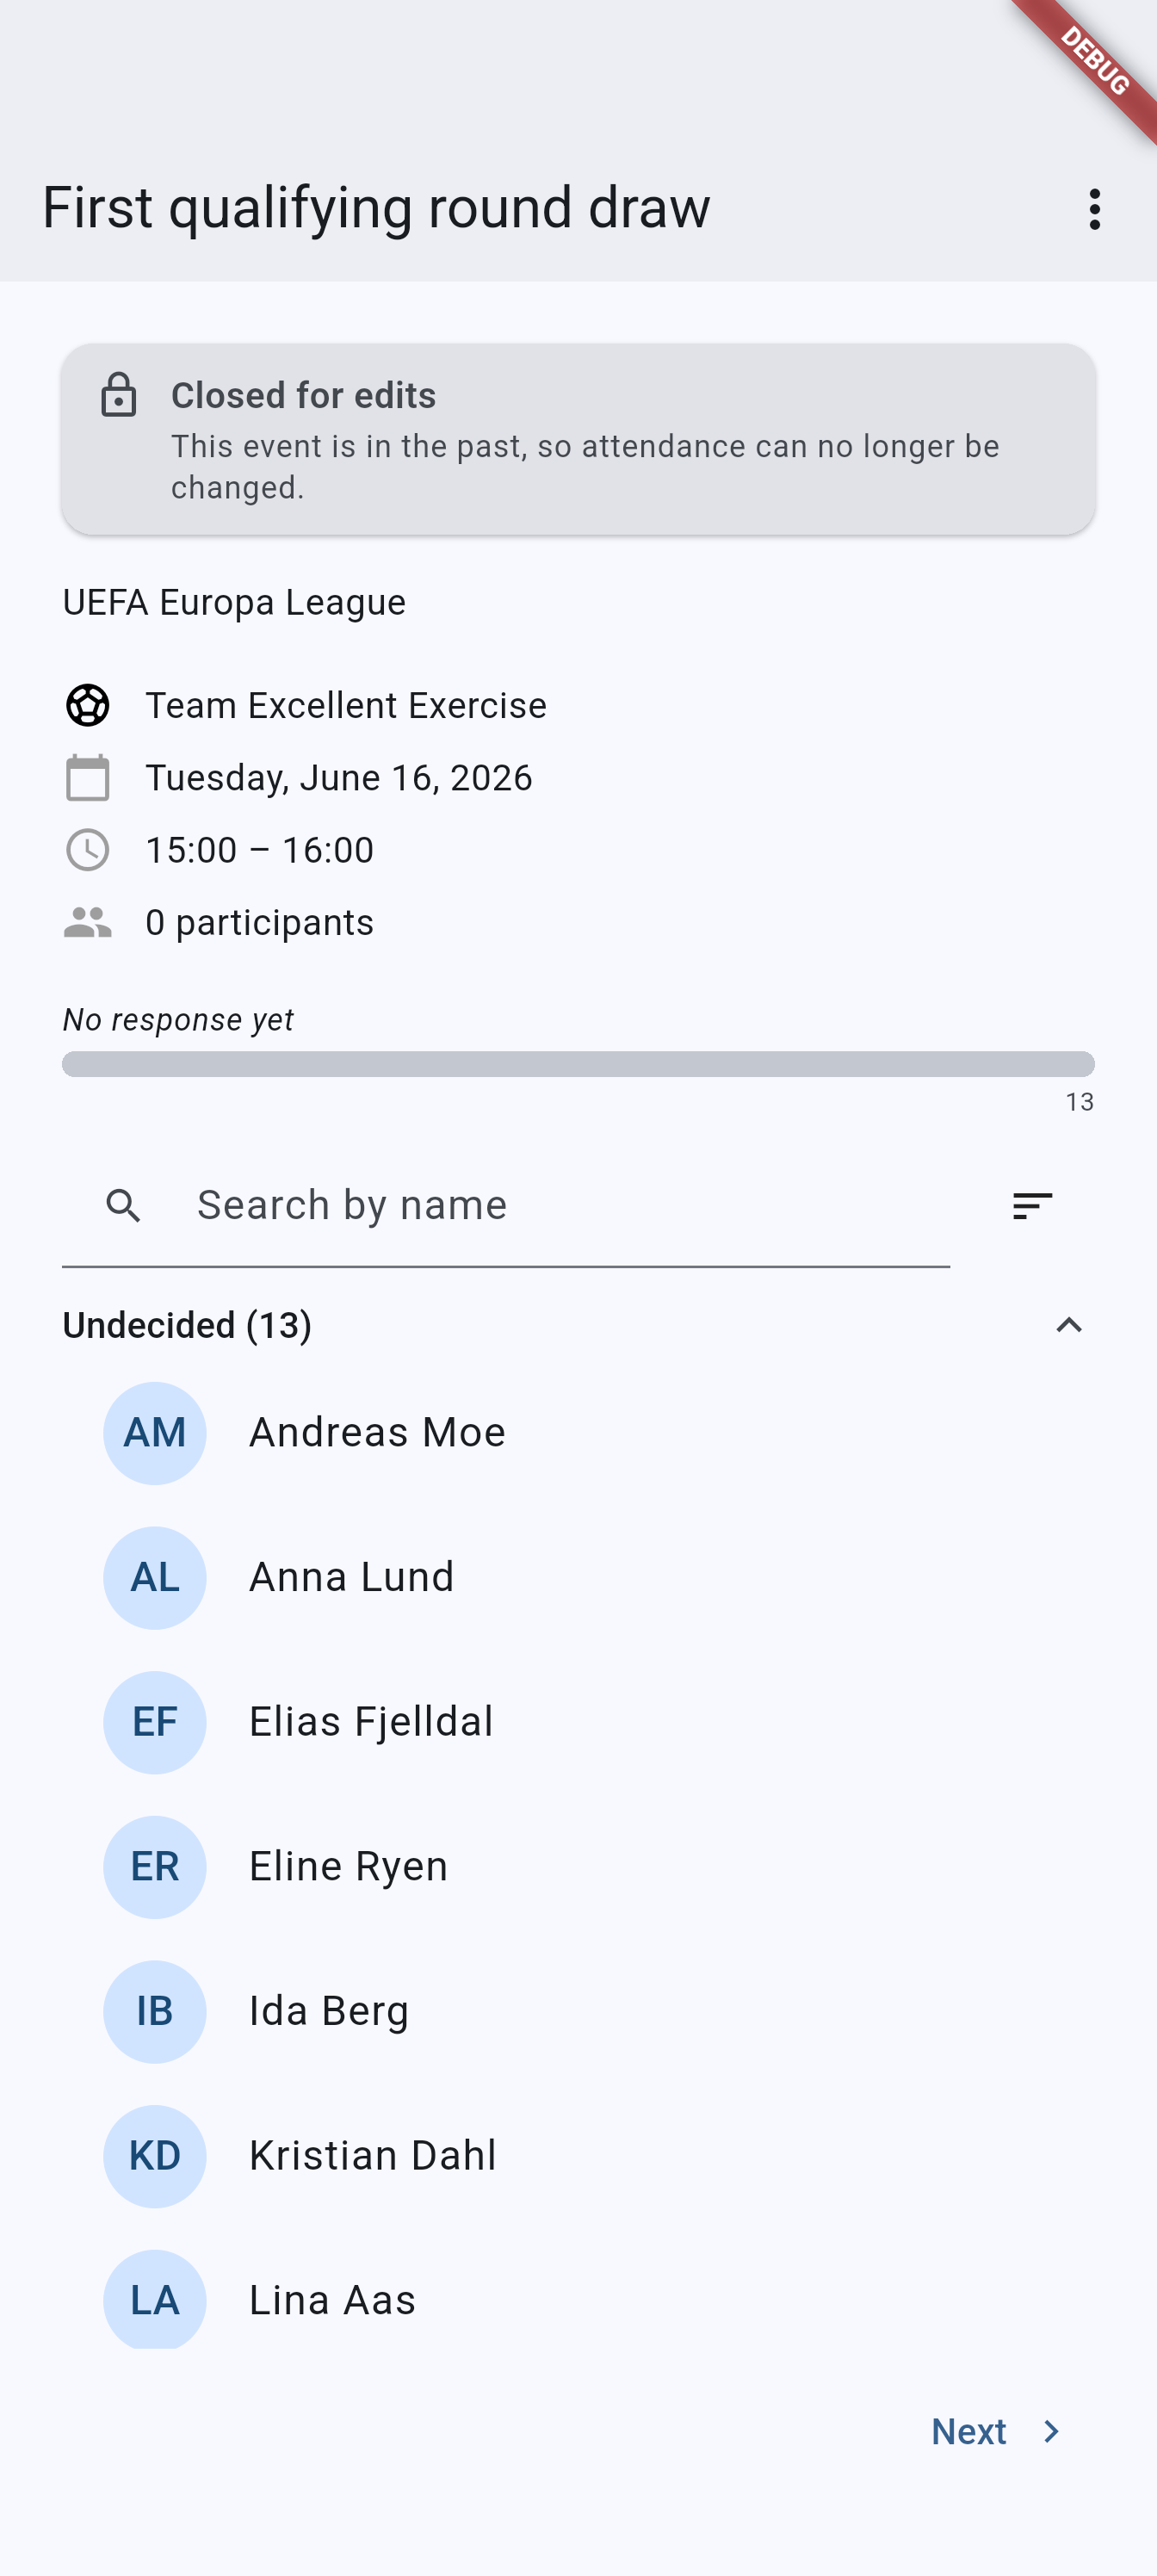
Event detail screen with RSVP actions, participant summary, and the participant list visible together.
location-picker-android.pnglocation-picker-ios.png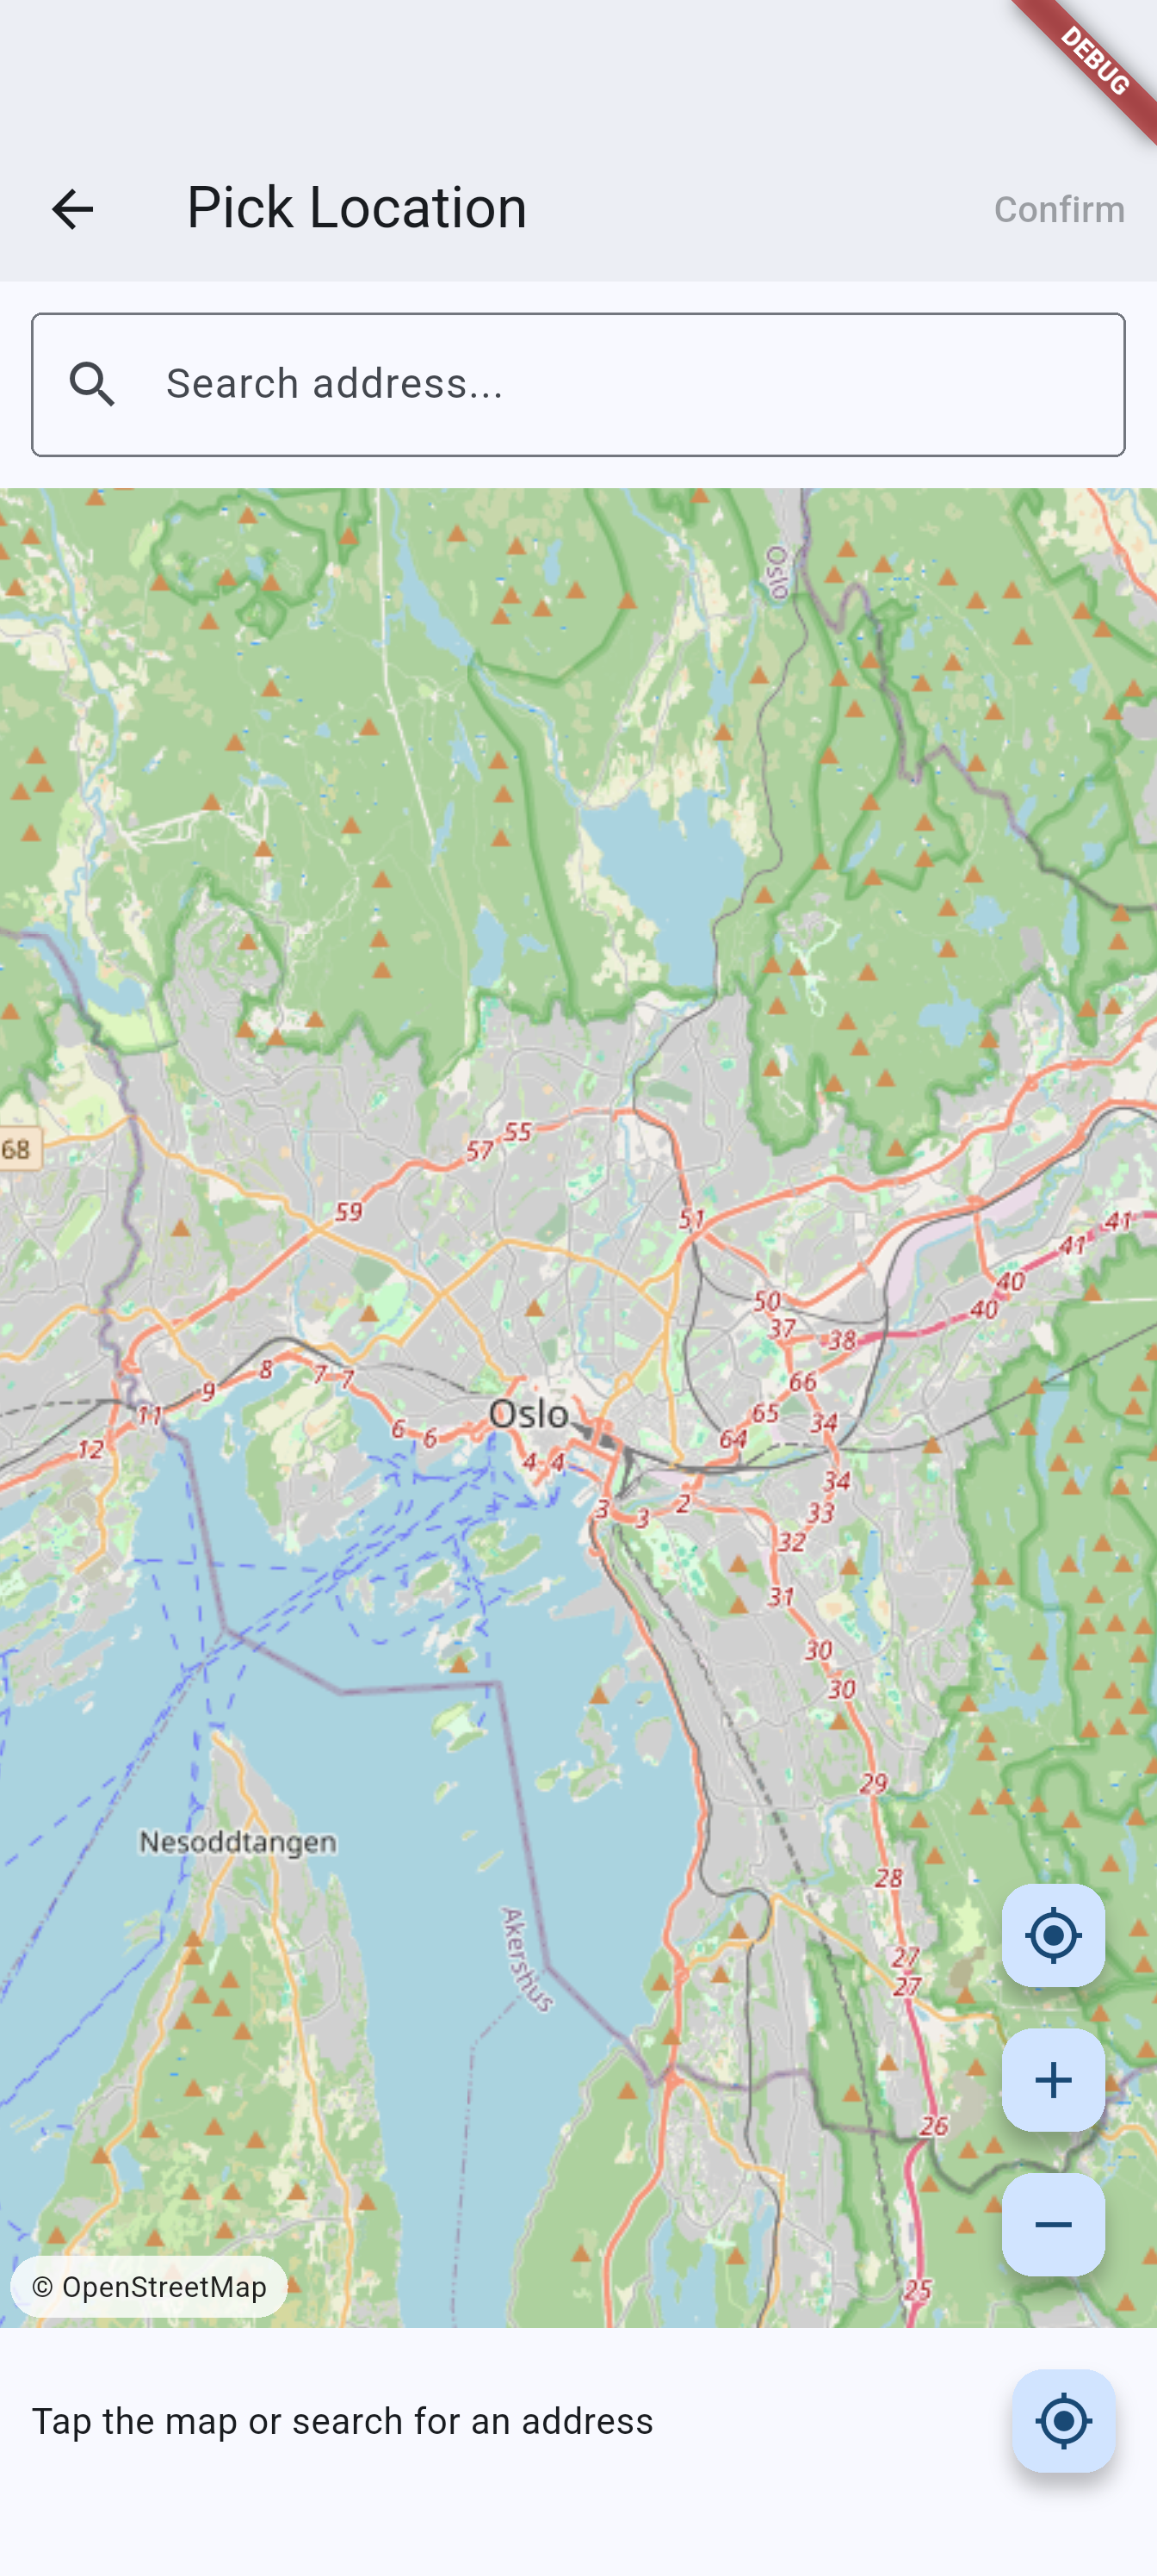
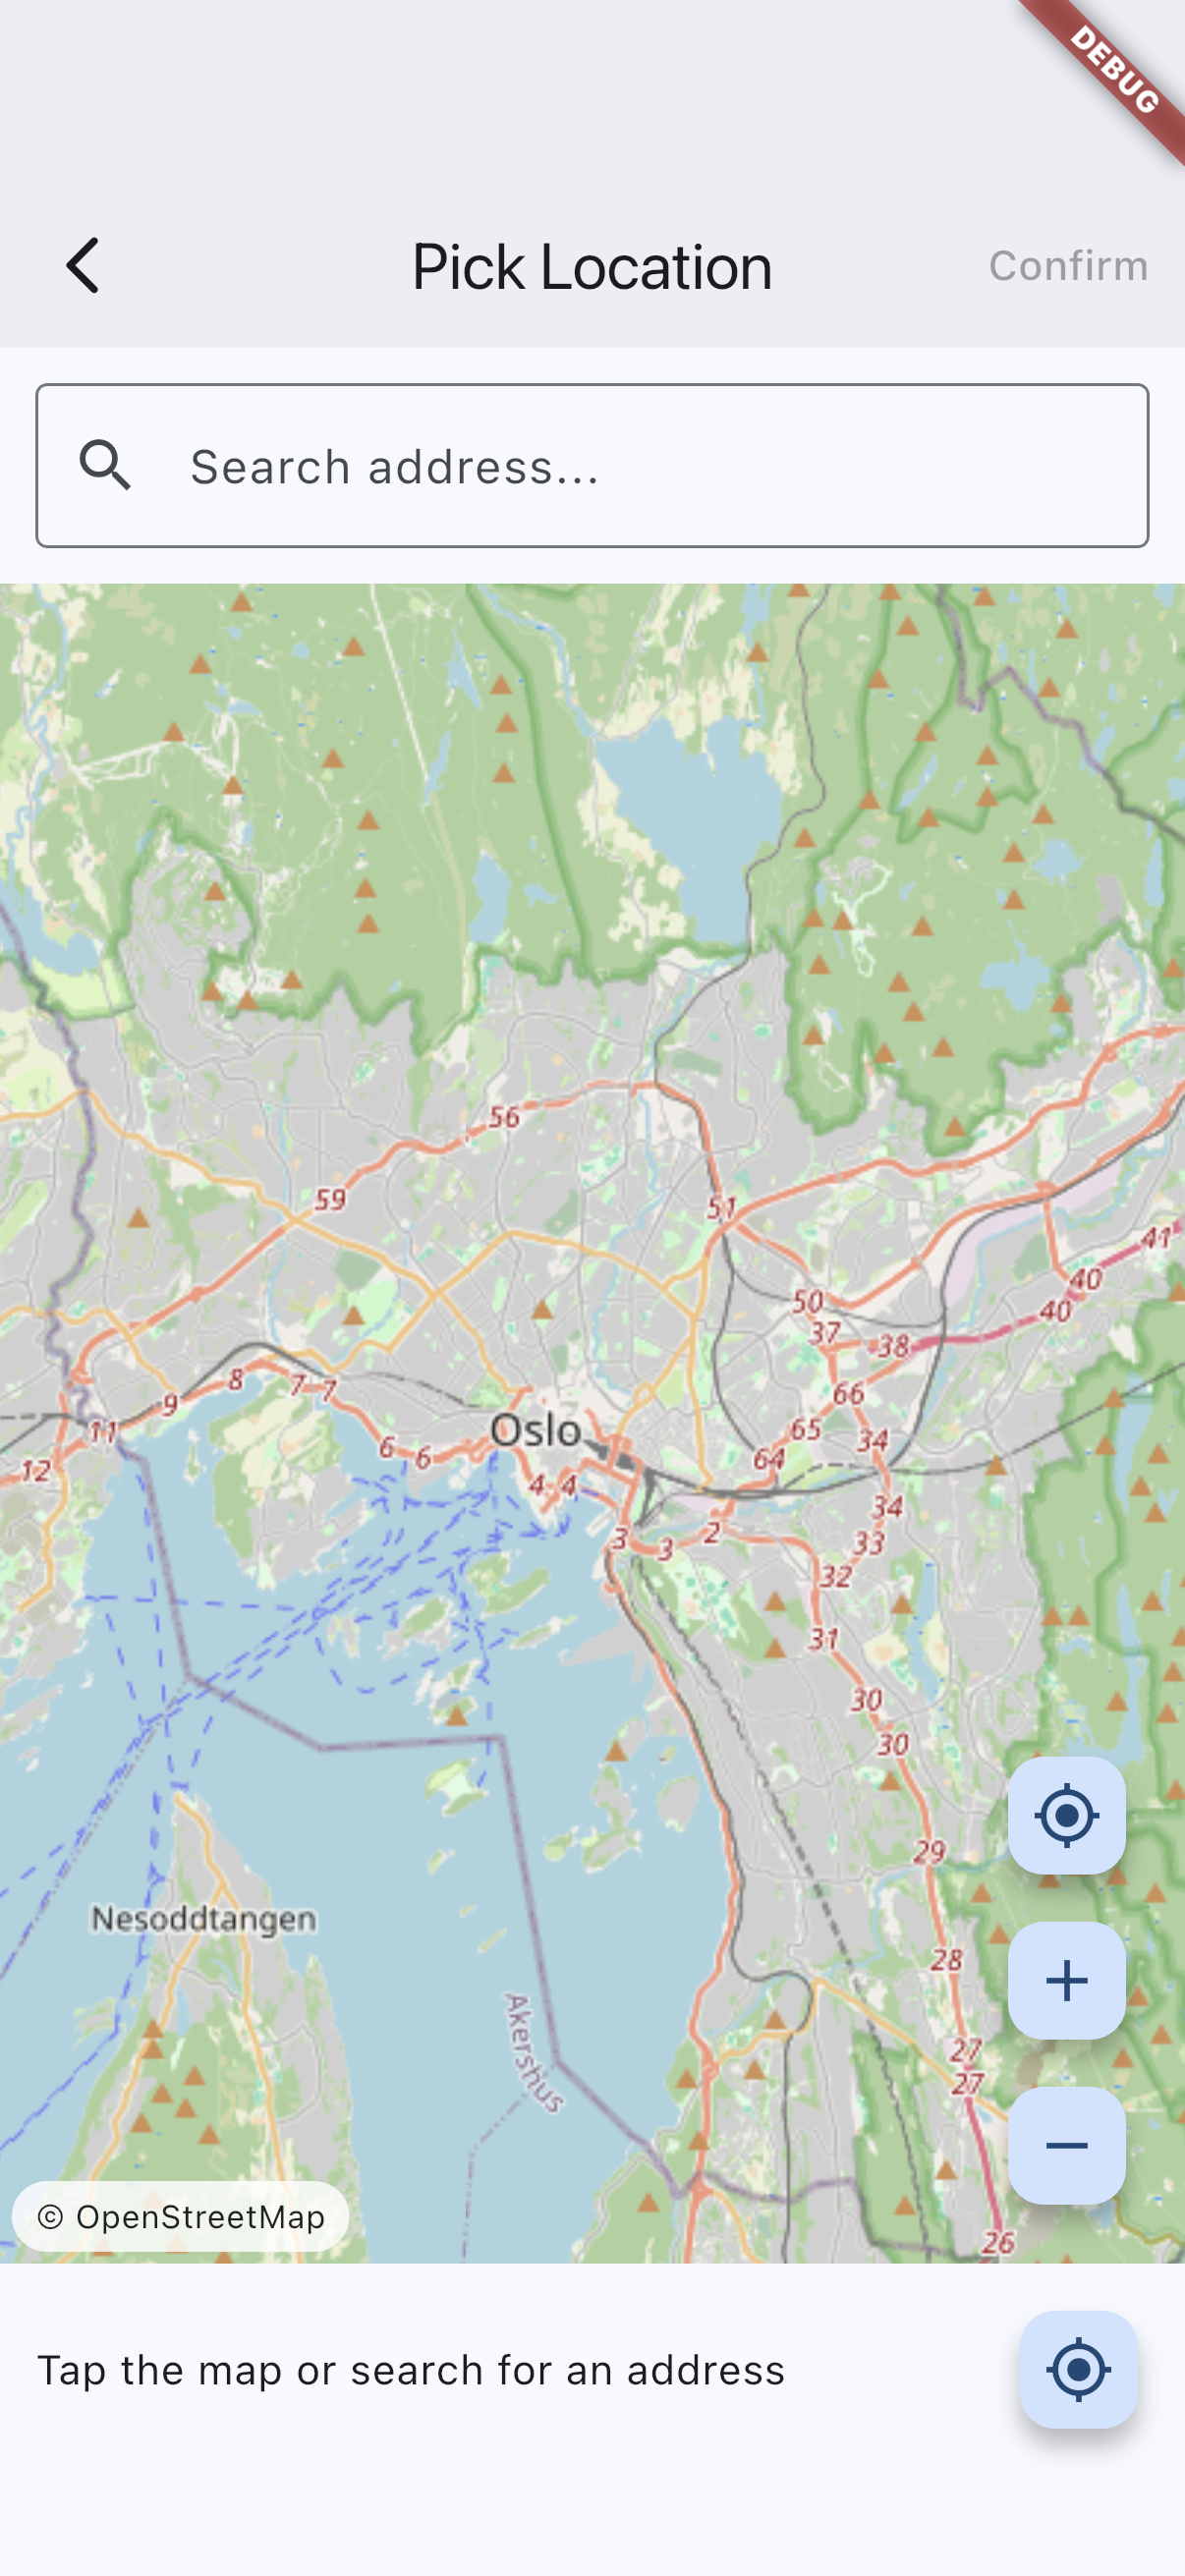
Recommended capture: the location picker with a search result list, a placed map pin, and the confirm action visible.
attendance-confirmation-android.pngattendance-confirmation-ios.png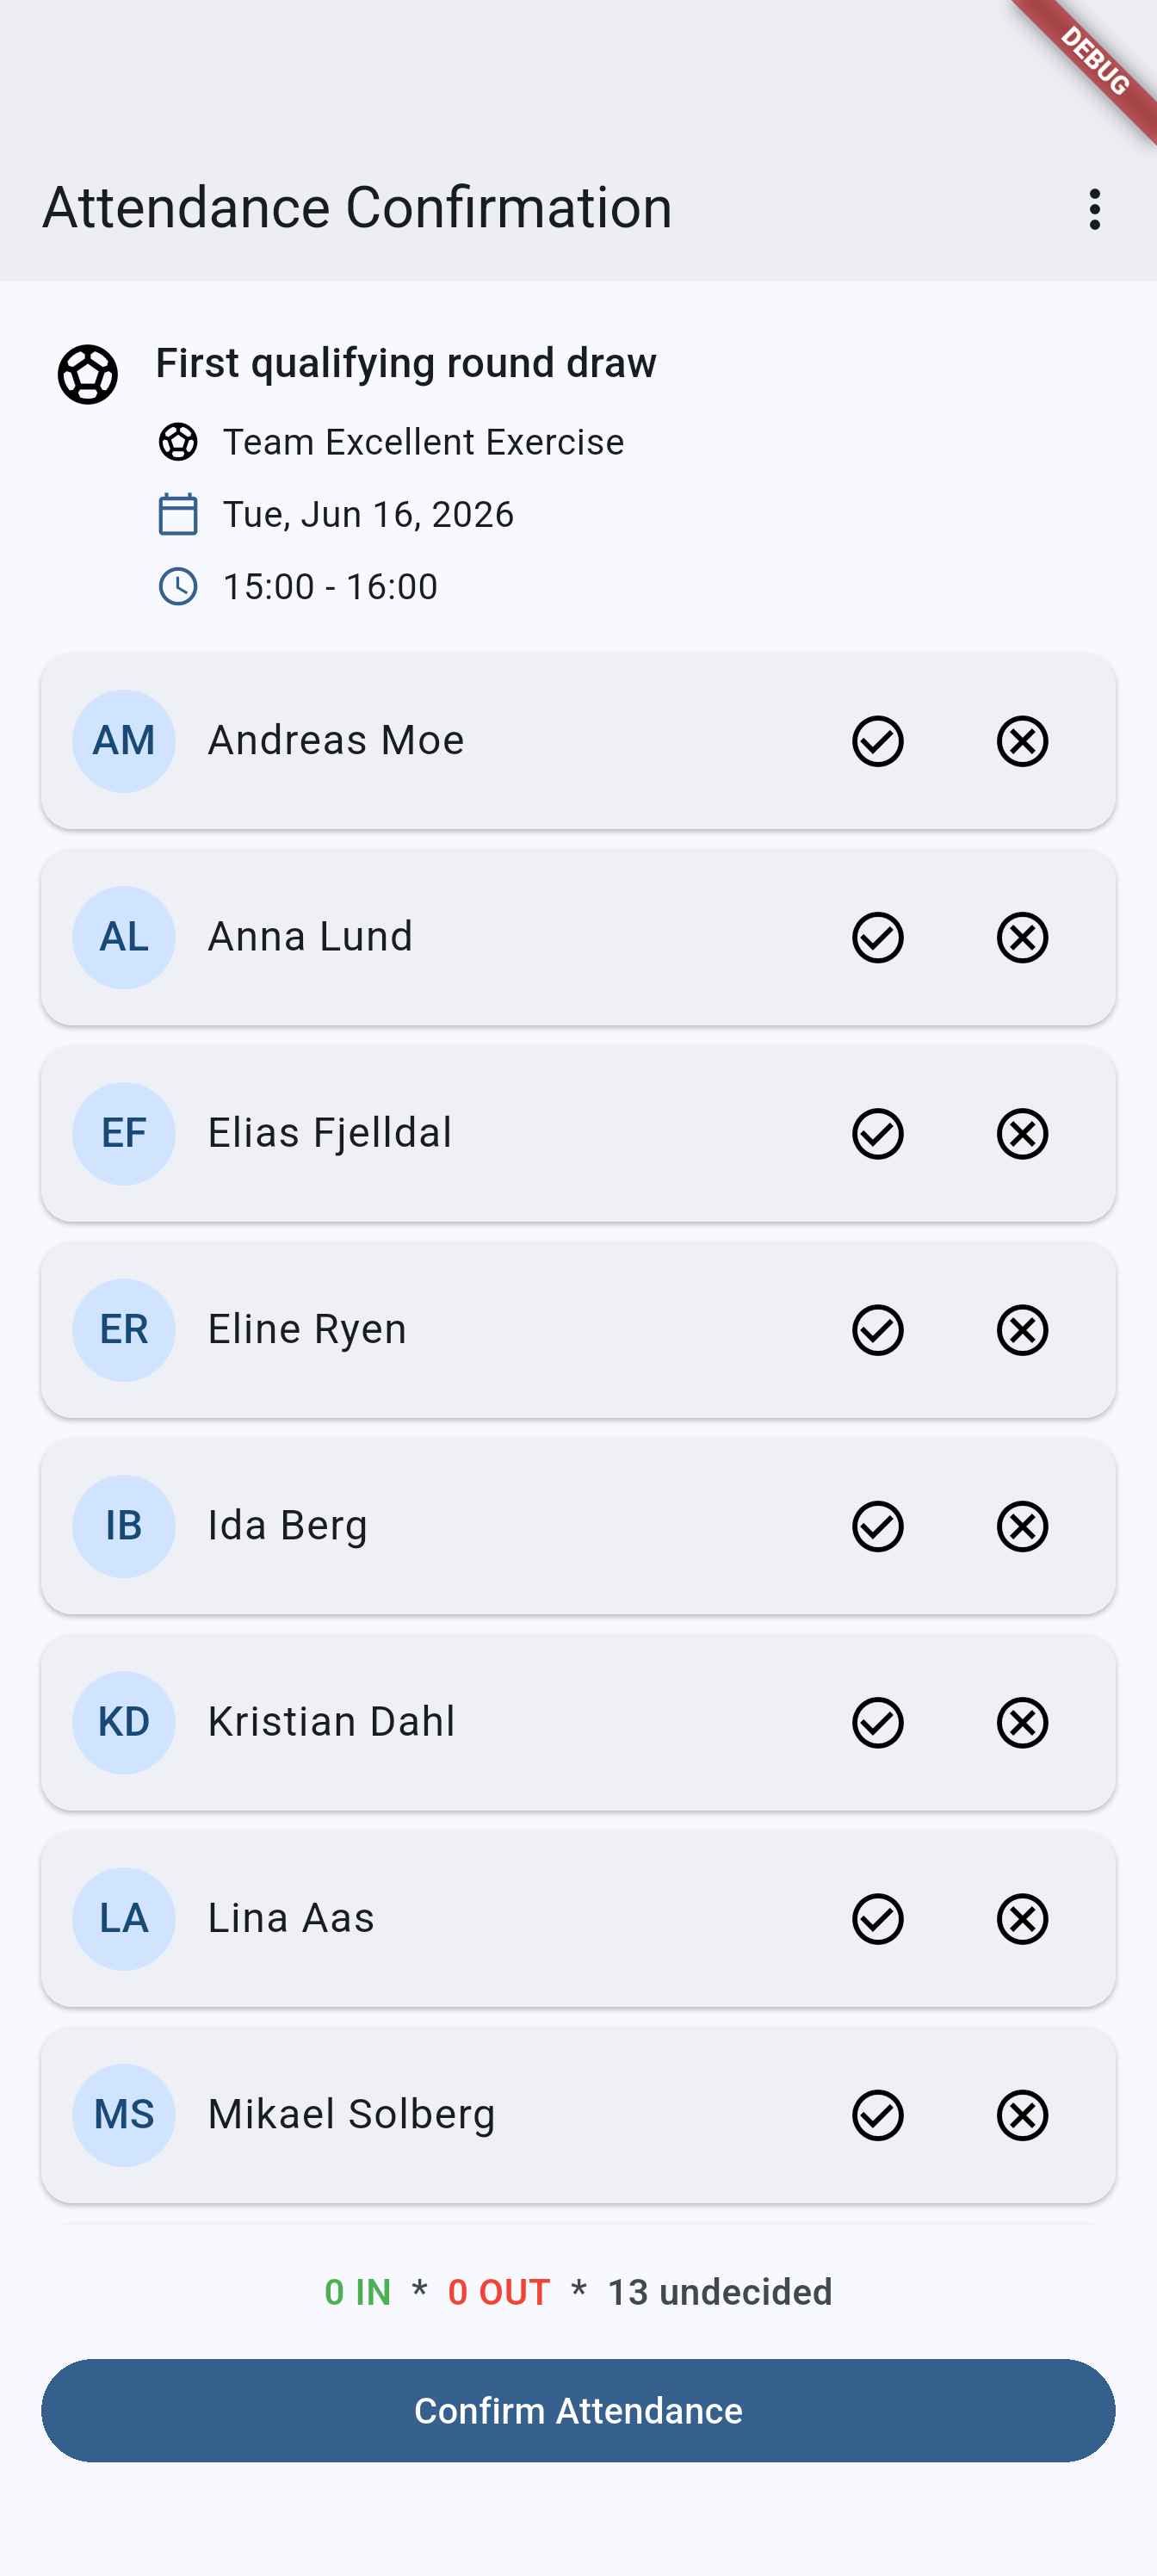
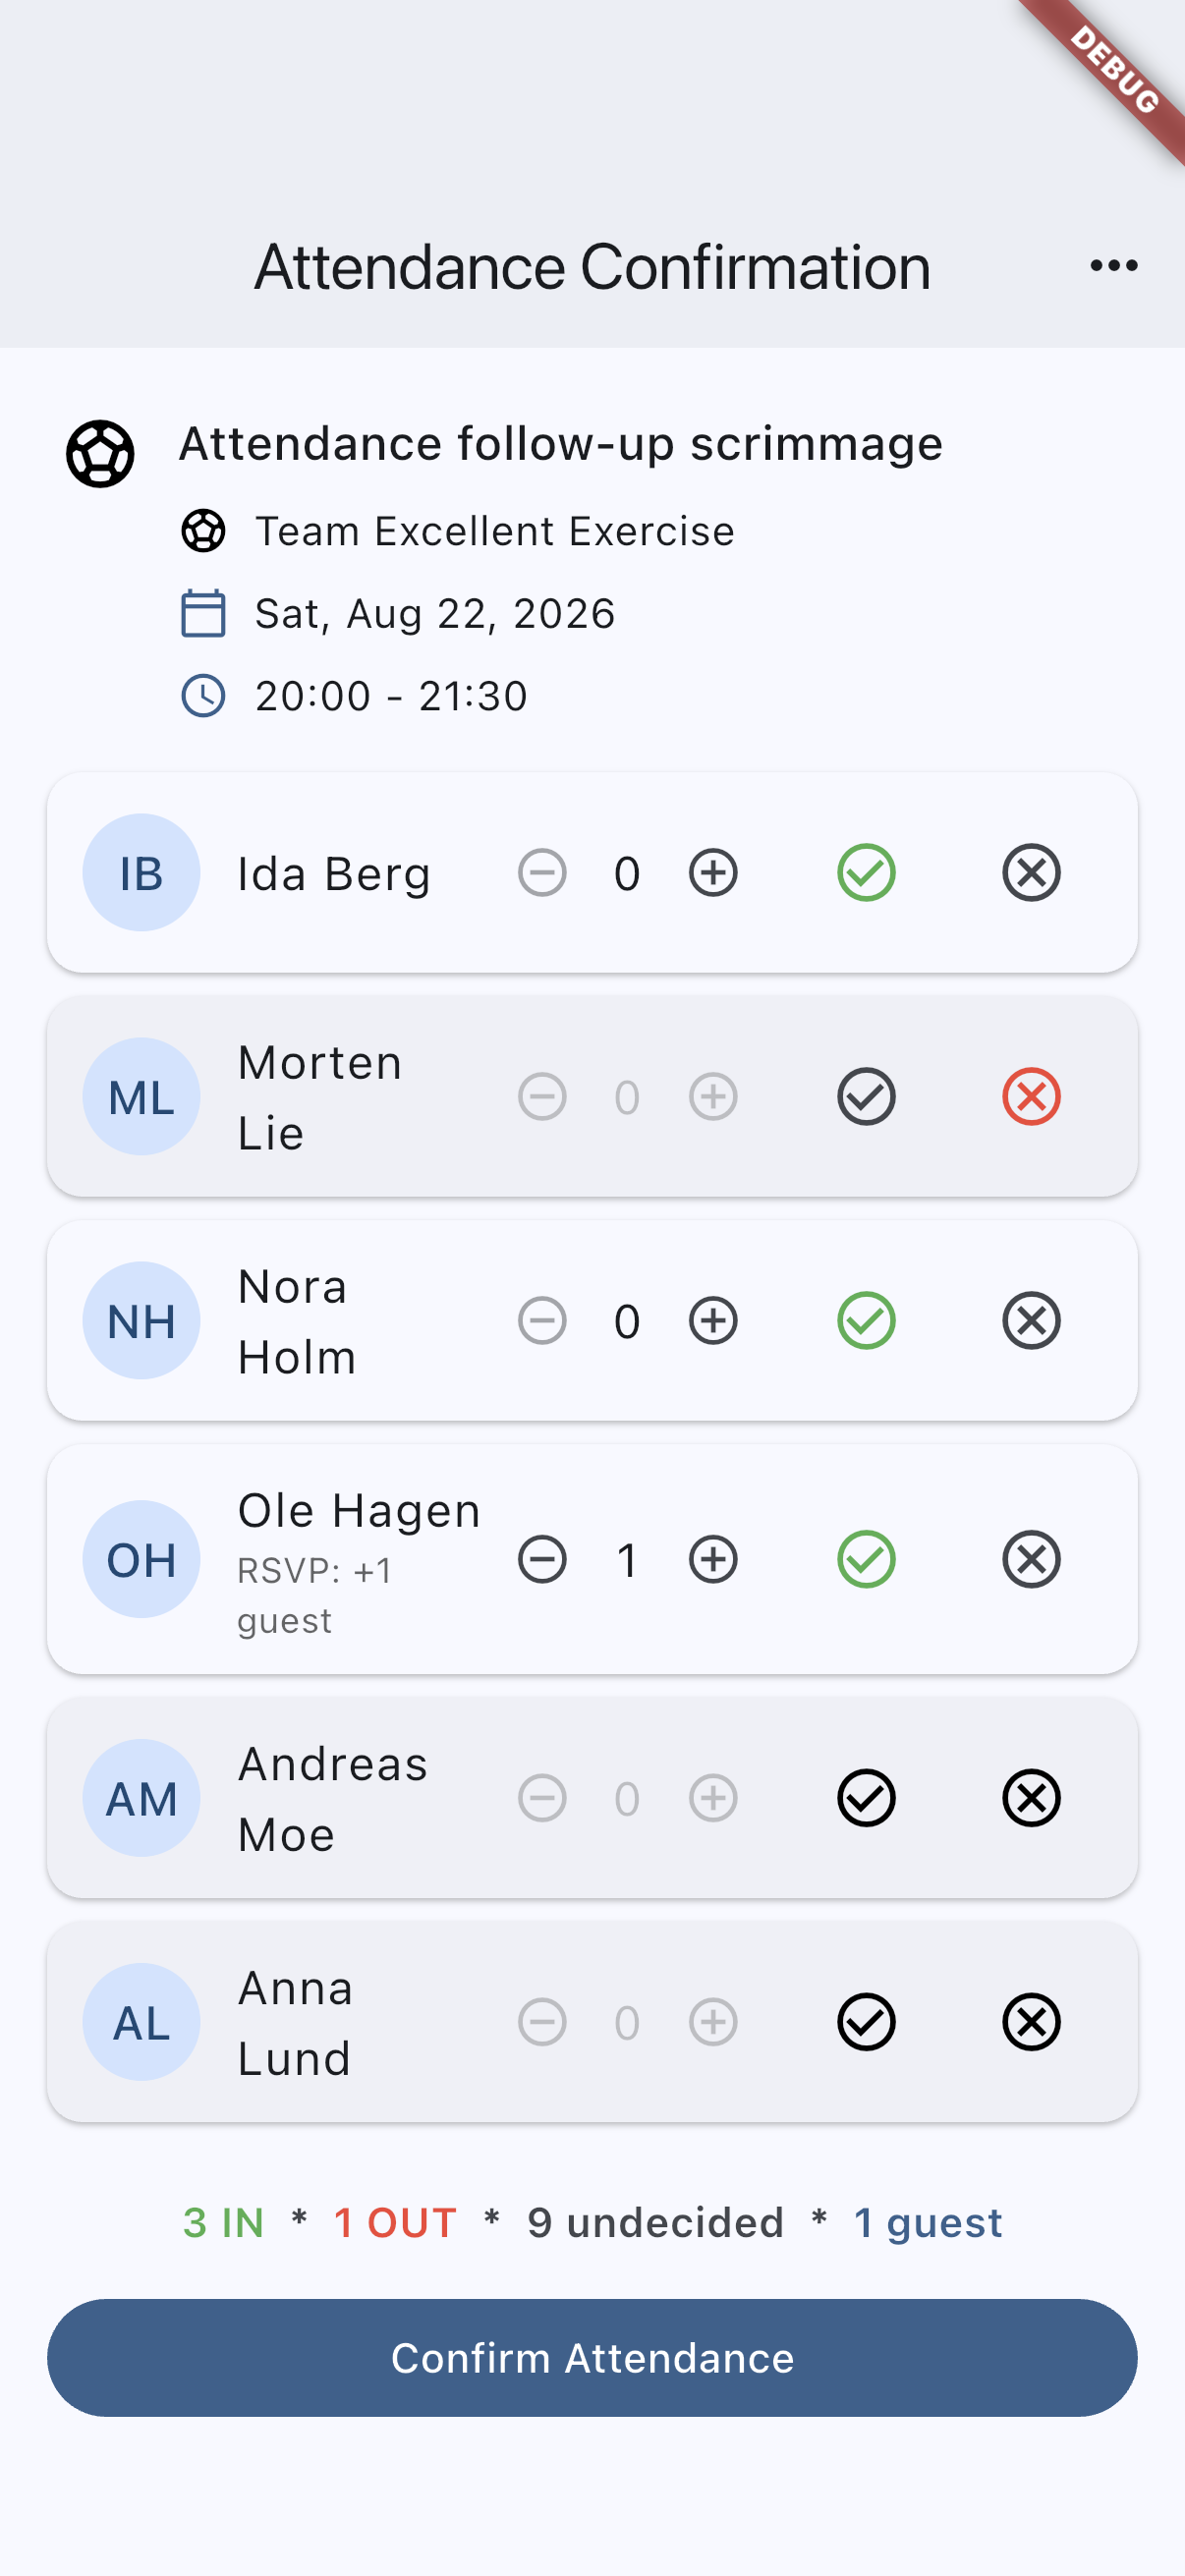
Attendance confirmation screen for a Business-tier team with the participant roster and join or decline controls.
Waiting lists (Business)
When an event has a maximum attendance, Business teams can turn on Use waiting list. The toggle sits under the participant limits and only appears once a maximum is set — a waiting list needs a full house to overflow past.
Once it is on, a full event is no longer a dead end. The join button changes colour and reads Join waiting list, and tapping it puts the member in a queue rather than turning them away.
A few rules are worth knowing:
- A place in the queue is one seat and never includes guests, even on events that allow them. The guest picker does not appear on this path.
- The queue is strict first-in, first-out, with one offer outstanding at a time.
- When somebody drops out, the person at the front is offered the freed seat and has a limited time to confirm it. If they let it lapse, the offer moves to the next person in line.
You configure two confirmation windows per event:
- Confirm within — used while the event is still days away.
- Confirm within (on the day) — a shorter window for a seat that opens on the day of the event itself.
If less time remains before the event starts than the window allows, the window is shortened so the offer expires at the start rather than being skipped.
Quiet hours
Seats free up at all hours, and nobody wants a push notification at three in the morning. Each team sets the daily window its offers run in — Waiting list offers start from and Waiting list offers stop at — in Team settings → Features (Business).
A seat that frees up outside that window is reserved for the person at the front straight away, but the notification and their confirmation clock both wait until it reopens. The clock also pauses when the window closes and resumes the next morning, so an offer made at 21:00 with a 12-hour window and an 08:00–22:00 span expires at 19:00 the following day rather than in the small hours.
What members see
- Their place in the queue on the event, and on the Next Up panel as a small “Waiting” badge with their number.
- When a spot is offered: a highlighted card with a countdown, plus Confirm spot and No thanks.
- If they open the notification too late: a panel explaining that the confirmation window closed and the place went to the next person, with the option to rejoin at the back of the queue.
What admins see
The event shows how many people are waiting — that count is visible to everyone. Admins additionally see a Waiting list section on the event, listing the queue in order with the member currently holding the offer marked.
That list is read-only. Admins cannot promote, reorder or remove people from it; the queue only ever moves through the offer process. Adding somebody directly to a full event is still possible through the normal admin controls, but it takes a seat rather than a place in the queue, and it cannot take a seat already promised to somebody.
Related pages
- Prize draws for raffles at a session and draws for the whole team.
- Activity planning for cases where the date is still undecided.
- Calendar subscriptions for read-only imported events controlled by an external feed.
- Profile and security for device calendar sync and time-off settings that affect participation.